Calatheas are thirsty houseplants, and many new owners work hard to supply them with plenty of water and humidity. Unfortunately, these efforts can go too far, giving rise to an extremely nasty condition known as root rot. If your Calathea looks parched and shriveled despite being planted in moist soil, you may need to take quick action to save it from rotting away.
Slide your Calathea out of its pot and give the roots a close inspection. If any appear gray, black, squishy, or slimy, you’ll have to prune them away to keep the infection from spreading. Use disinfected scissors, and if you take off more than ⅓ of the root system, prune the foliage to reduce the demands on the plant’s root system as it recovers. Then repot your Calathea in fresh soil and a clean pot.
We won’t sugarcoat it: sometimes these measures aren’t enough. Rot can spread through a large portion of the plant’s roots before the signs are apparent aboveground, and in some cases, the damage is too extensive to overcome. But if you act quickly and follow the steps we describe below, you may be able to rescue your Calathea.
What is Root Rot, and How Did My Calathea Get It?
To the naked eye, it might appear that your Calathea is the only thing living in its pot. The view through a microscope tells a very different story. There’s an entire universe of bacteria, fungi, and other minuscule organisms living in the soil alongside your houseplant.
Typically, these tiny critters aren’t a problem for your Calathea. Depending on the potting mix you use, there may even be some beneficial varieties that help your plant by increasing the amount of available nutrition. But this happy balance can change if the soil environment stays too damp for too long.
Dry or damp soil contains lots of tiny pores and air pockets that get filled in by liquid if the medium becomes waterlogged. Your Calathea’s roots need oxygen to function, so any prolonged amount of time in soggy, airless conditions will harm them. At the same time, anaerobic fungi and bacteria multiply at a breakneck pace in this kind of damp, dark, oxygen-free environment.
As these microbes reproduce and spread, they’ll take a look at your Calathea’s stressed-out roots and think: “It’s free real estate.” Weakened by smothering sludge, those roots can’t fight off the tiny, hungry hordes creeping in. The microorganisms invade the plant and start eating it from the inside out.
We’re painting a pretty grim picture, but that’s only because this is a severe threat. Exactly how serious depends on how bad the soil conditions are and on the overall health of your Calathea. A bad case of root rot can kill your plant in around two weeks if it’s not treated quickly.
Typical Causes of Overwatering
When we say that root rot comes from overwatering your plant, what we really mean is that you’re overwatering the soil. You can give your Calathea as much water as you like if it’s draining and evaporating from the pot quickly enough. The problem arises when the plant’s growing medium stays sopping wet for long periods of time.
Here are a few common plant care mistakes that may cause the soil to stay too saturated for too long:
- Watering on a fixed schedule. Lots of houseplant owners like to keep their routine simple by watering once every few days. This can backfire because the soil won’t always dry out at the same rate. Instead, try establishing a routine of checking your Calathea’s soil at regular intervals, watering only when the top two inches of the potting mix feel dry to the touch.
- A pot with no drainage. The most important element of your Calathea’s container is the drainage hole at the bottom. Without an exit to flow through, any excess water you give the plant will sit right in the pot, prolonging the boggy environment that leads to root rot.
- Poorly draining soil. A growing medium with lots of small particles tends to trap and hold water instead of letting it wash away. Unfortunately, most commercial potting mixes fit this description, retaining moisture for much longer than many houseplant owners realize. It’s much easier to water your Calathea properly if you use a potting mix with a high proportion of chunky ingredients that improve aeration.
- An oversized container. Large pots are often tricky to water correctly. When the soil takes up a lot of space relative to your Calathea’s roots, it may take a long time to evaporate, increasing the odds that a significant amount of moisture will remain in the base between waterings.
If you’re interested in more detail on preventing root rot, check out our article on proper watering habits for Calatheas.
Warning Signs of Root Rot in Calatheas
Since root rot begins underground, you won’t be able to see it in action without uprooting your Calathea. So you should keep an eye out for changes to the foliage that can signal problems below the surface.
Ironically, although root rot is caused by overwatering, the early symptoms mimic the signs of dehydration. That’s because the plant relies on its roots to take up water for its leaves. You may notice the foliage wilting and turning yellow, especially the lower leaves at first. The tips and edges of the leaves may also turn brown or curl up.
This is why it’s crucial to pay close attention to the potting mix. If it’s damp all the way through (you can sink a wooden chopstick into the pot to check for moisture near the base), but your Calathea appears desperately thirsty, it’s a good bet that something is wrong with the roots. A nasty smell coming from the pot can also alert you to rot below the surface.
In fact, even before your plant starts to look sick, soil conditions can offer an early warning. Does the mix remain moist for 5 or 6 days after watering? That’s usually a sign that you’re giving your Calathea more hydration than it can handle. Try to let it dry out a bit more before you water it again, and consider repotting in a mix with better drainage.
More severe root rot symptoms include softening and slumping of your Calathea’s stalks or mushy brown spots appearing on the leaves and stems. These problems indicate a very advanced case of root rot since the infection typically starts at the tips of the roots and creeps upward. If the aboveground parts of your Calathea are beginning to decay, the disease has already come a long way.
How to Treat Root Rot in Your Calathea
Don’t wait until you start seeing rot on your Peacock Plant’s leaves before you take action. Stepping in quickly to check the spread of the infection is vital if you want to keep your plant alive. Follow these instructions to help your Calathea through this crisis.
Step 1: Preparation
Take a minute to gather some supplies before treating your Calathea. Root rot calls for some fairly intense plant surgery, and it’s important to make sure your operating room is fully prepped!
Here’s what you’ll need:
- A good set of pruning shears. A pair of sharp scissors will also do in a pinch.
- A clean cloth.
- Some disinfectant – you can use hydrogen peroxide, ordinary bleach diluted to 10% strength, or the kind of isopropyl alcohol you’d find in a first aid kit.
- Mild liquid soap with no additives like degreasing chemicals.
- Fresh potting mix – see our post on Calathea soil requirements for some ideas.
You may also want a pair of garden gloves, since you’re going to be uprooting the plant, and that will get messy. For the same reason, we recommend laying down something like an old towel or a tarp before you get started. Set everything up by a sink, tub, or outdoor hose.
Step 2: Diagnosis
Grip your Calathea gently but firmly by the base of the stems and turn the pot on its side to let the plant slide out. If it’s stubborn, you can tilt it upside down and smack the bottom of the container until it loosens up. This method is less likely to damage the already fragile roots than simply yanking the plant out of the pot.
Wash the root ball clean with warm water (not too hot) and gentle soap. Be patient and avoid tugging on the roots – the last thing you want at this point is to snap off a healthy one! Use your fingers to pry loose any clinging clumps of soil.
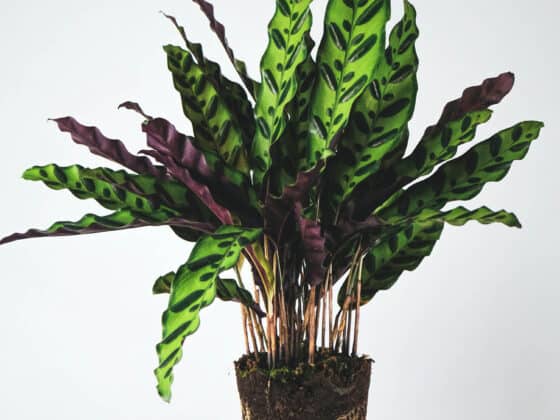
Now that the roots are clear, you can inspect them for signs of infection. Calathea roots in good condition will have a pale color and feel firm and springy. Any roots that look gray, dark brown, or black are infected; ditto if they’re soft and gooey to the touch.
If the root mass appears completely healthy, you can breathe a sigh of relief and skip to step 7. If even one root looks infected, go on to step 3.
Step 3: Prune the Roots
Apply some disinfectant to your cloth or rag and wipe down the blades of your shears. Removing the infected tissue won’t help if you’re introducing new germs into the cuts. Then start trimming away any roots that look sick.
This will only work if you’re thorough; overlook any rot, and it will start to spread again when you put your Calathea back in its pot. Remove every root that shows the slightest sign of illness. If you find one that has a healthy-looking color but feels a little mushy when you poke it, show no mercy.
Keep disinfecting your blades between snips. Otherwise, you risk transferring harmful microbes from the diseased parts of the plant to the healthy ones. Do your best to make clean cuts, because any ragged edges you leave will be more susceptible to reinfection.
Step 4: Prune the Leaves and Stems
If the plant only needed a couple of slimy roots removed, then this step is primarily cosmetic. You can take off any foliage that appears completely dead and trim away brown tips or edges that are spoiling your Zebra Plant’s look. Any stems or leaves that show indicators of root rot should, of course, come off as well.
If you had to slice away more than ⅓ of your Calathea’s root mass, then you’ll need to trim down the foliage to match. Rebuilding its root system will cost the plant a lot of energy, so it doesn’t need the added burden of supporting too many leaves. Take off roughly the same percentage of the foliage as you removed from the roots.
Just as before, sanitize your snippers before and after each cut. Start with the least healthy leaves, taking out anything with yellow or brown patches before removing any intact foliage.
Note that this is a bit of a Hail Mary pass – when a case of root rot is extensive enough to require substantial leaf pruning, there’s no guarantee that your Calathea will recover. Still, this treatment is your plant’s best hope.
Step 5 (Optional): Disinfect the Roots
Slicing off the rotting parts of the root mass should most likely get rid of the harmful microbes. However, if you want to ensure that you’ve gotten them all, you can dunk the roots in a sanitizing solution.
The 10% bleach solution we suggested for cleaning your clippers will work nicely, as will a mix of 1 part hydrogen peroxide to 4 parts water. You can also dust some powdered cinnamon over the roots – it has antifungal properties that make it a good natural disinfectant.
Step 6: Clean or Replace the Pot
The fungi and bacteria that caused the rot don’t live in the roots alone – they got their start inside your Calathea’s pot, and there’s probably a substantial population still inside. Clean the container out thoroughly if you plan to return your plant to its old home. Start by scrubbing it out with soap and water, then sanitize it using whatever disinfecting agent you used on your shears.
You may want to give serious thought to replacing the pot instead of reusing it, especially if it lacks drainage holes. As we mentioned further up, a pot with a solid base traps water and could land you right back in the same situation before long. If the existing pot is plastic, you can easily add holes with a drill; otherwise, it might be time to buy a container with better drainage.
Another reason to use a new pot is if the old one is too large or too small. Remember, a pot that’s too big for your Calathea is easy to overwater. Even if the size was okay before, it might be too large after you’ve pruned away a hefty chunk of the plant’s roots and leaves.
On the other hand, if your Calathea looks heavily root-bound (see below), it may be due for an upgrade in pot size anyway. In that case, try replanting it in a container that’s 1 or 2 inches greater in diameter.
Step 7: Replant Your Calathea
Don’t try to reuse your plant’s old potting soil. Unless you’re a DIY scientist with an autoclave in your home (in which case, can we be best friends?), there’s no way you can get rid of the pathogenic organisms in the soil.
Fill the container about ¾ full of fresh potting mix, nestle your Calathea inside, and then fill more soil in over the roots. Pat the surface down gently until the plant’s roots are snug but the potting mix isn’t compacted. Then add a bit of water, just enough to get the soil damp.
Step 8: Give Your Calathea Plenty of TLC
You’ll need to baby your Calathea even more than usual while it’s recovering from its ordeal. Keep it somewhere with mild temperatures, high humidity, and no exposure to direct sunlight. Avoid adding any kind of fertilizer until it’s back on its feet – the root system is too delicate for that right now.
It will probably take a month or two before new growth begins emerging on your Calathea. The roots need time to regrow and get established in the new soil before the plant can sprout anything above ground. Be patient, and be extra careful not to overwater during this recovery phase.
What If It’s Not Root Rot?
As we mentioned, the aboveground symptoms of root rot can resemble a number of other conditions. If you see no signs of decay when you take your Calathea out of the pot, you’ll need to determine what’s actually behind the wilting and discoloration you’re observing.
One possibility is that your Calathea is root bound. When a plant grows too large for its containers, the roots begin to wrap around one another, clumping into a gnarled mass that mimics the shape of the pot. This impairs their ability to take up water and nutrients, which can cause the same dehydrated appearance as root rot.
If the plant is root bound, you’ll know it when you take it out of the pot. The roots will be tightly packed, curled up, and overlapping, some of them wrapping around horizontally to encircle the others. To fix this, you can gently work the mass apart with your fingers until it looks more like an upside-down tree again, instead of a can of worms.
If it’s gotten really bad, you may need to prune back some of the longest roots. Disinfect your trimmers and start at the lowest part of the root ball, making clean cuts. Remove no more than ⅓ of your Calathea’s roots. Then repot your Calathea in a larger container.
An accumulation of mineral salts in the soil can also impede the roots – in fact, Calatheas are more susceptible to this issue than your average houseplant. If you followed Step 1 above, you should already have fresh potting mix on hand, so go ahead and replace the old soil. If you regularly fertilize your Calathea, consider lowering the dose moving forward; if you give the plant tap water, consider switching to distilled.
Finally, dry air can cause a Calathea’s foliage to look thirsty even when the roots are working correctly. Try to keep the humidity around the plant above 50%. Some tricks that can help:
- Group it with other moisture-loving plants
- Keep it in a bathroom or other damp space
- Use a humidifier
- Place your Calathea’s pot on a pebble tray with a bit of water in the base
Final Thoughts
Root rot is a scary disease, but there’s probably still a chance for your Calathea if you take decisive action. So don’t delay! The steps above should give your plant the best possible shot at recovery.
Once you’ve addressed the immediate crisis, take stock of your care habits and try to figure out how you wound up overwatering your plant. Don’t beat yourself up – a few mistakes go into every green thumb. As long as you keep learning from them, sooner or later, you’ll understand how to give your Calathea the lifestyle it craves.