Spider mites are one of the more frustrating pests that affect our houseplants. Because of their teeny tiny size, they are hard to identify before you start noticing damage to your plant, and they can often evade even our best treatment efforts. So, what can you do about them?
Spider mites are common houseplant pests that tend to gather on the underside of leaves, feeding on your plant’s sap using needle-like mouthparts. You may see yellowing or stippled leaves, and even some webbing, before you realize you have an issue. Luckily, plenty of treatment options are available to get rid of them.
Spider mites are almost invisible to the naked eye, so identifying an infestation usually happens when you notice signs that your houseplant’s health is declining. Although they can establish a population quickly, spider mites aren’t invincible. With a little know-how and some persistent and well-timed treatment applications, you should be able to knock back their numbers pretty efficiently.
In this article, we will cover what spider mites are, how they feed, reproduce, and spread, and what treatment options you can use to eliminate them.
What Do Spider Mites Look Like?
A few varieties of spider mites can infest a houseplant, but by far, the most common type is the two-spotted spider mite.
Adult two-spotted spider mites have an oval-shaped body with eight legs and are very, very small (only about 1/50”). They are commonly a greenish or almost translucent color but can also be brown or orangey red. Under magnification with a microscope or a magnifying glass, you can easily see two dark spots on the body.

Spider mites are not insects. They are arachnids that are related to spiders and ticks (hence their eight legs). They live exclusively on plants and are not harmful to humans at all.
Because these guys are so small, seeing them with the naked eye is often very difficult. This is why they go unnoticed until they inflict enough damage to a plant to alert us that something is wrong.
How Do Spider Mites Reproduce and Spread?
Unlike other common houseplant pests with lifecycles involving both soil and plant tissue, spider mites live their entire lives on the host plant.
Adult females live for two to four weeks, feeding on the plant and laying eggs. Depending on the conditions, one female can lay up to 200 eggs in their lifetime. These eggs hatch, and the larvae go through two nymphal stages before becoming adults. This can take anywhere from five to twenty days.
Because this lifecycle is carried out so quickly, it is easy to see how just a few spider mites can explode into a huge population in a short amount of time.
Spider mites are a bit more sedentary than other pests like aphids, fungus gnats, or thrips. However, because they are small and easily attach to passing objects, they can be carried from one plant to another, often without us even realizing it. They are very easily carried indoors on our clothing or shoes or even on our pets’ coats who just wandered through the garden.
They can also be carried into our homes on other plants we bring in. Nurseries and plant stores do their due diligence when it comes to making sure their stocks are pest free, but because they are so tiny, a small community of spider mites can easily be missed or left untreated.
Oftentimes, when we purchase a new houseplant, we bring it home and place it amongst the rest of our plant collection without even thinking about whether or not it has any bugs. If just a couple of stray spider mites happen to hitch a ride into our homes on our new plant, they can easily spread to others nearby.
Signs That Your Houseplant Has a Spider Mite Issue
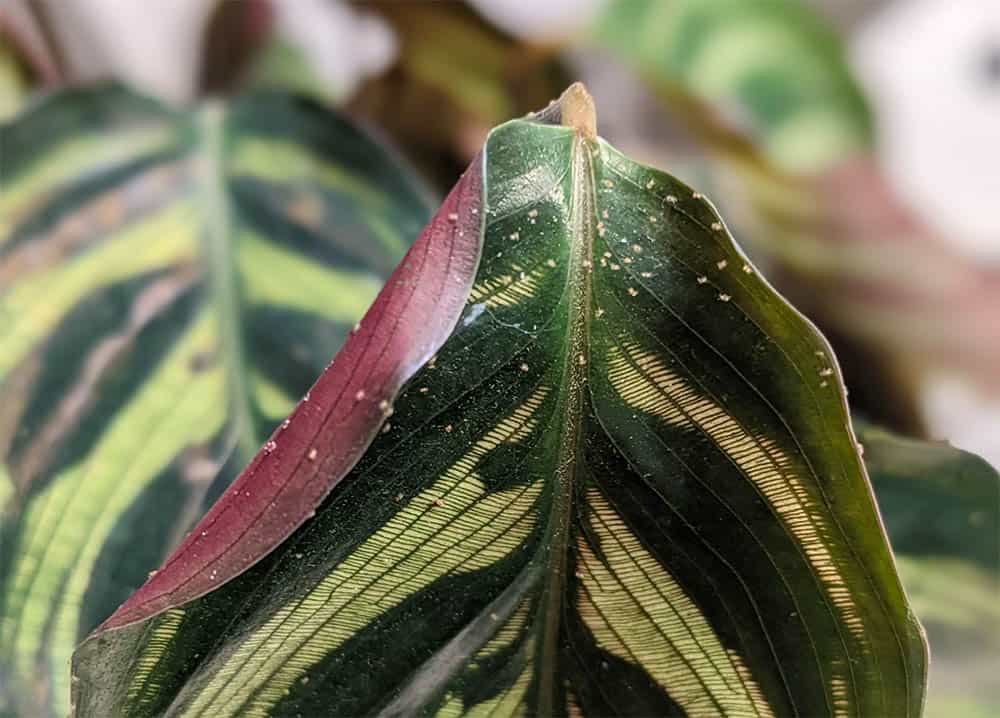
Because spider mites are so tiny, they can often go unnoticed on our houseplants for quite a while. That is, of course, until we start seeing the telltale signs of a full-blown infestation. Before you have any inkling that you might be dealing with a spider mite issue, you will probably start to see signs of distress on your houseplant. You may notice yellowing spots of chlorotic tissue on the leaves, or they may have an overall dusty looking appearance.
Spider mites bite into a plant’s tissues to suck out the sap running just beneath the surface. They do this using their very sharp, needle-like mouthparts. Over time, as the population grows and they continue to feed, you may start seeing swaths of stippled tissue on several leaves. Upon closer inspection, you can also see very tiny white dots along the surface, almost like the chlorophyll in those areas got sucked away.
With particularly bad infestations, you will likely start noticing a fine webbing covering plant surfaces, spanning from leaf to leaf and covering flowering parts. Not all mite species create webs, but the two-spotted spider mite certainly does. They use this webbing as small bridges to different parts of the plant and often lay eggs within it.
If left untreated, your plant may begin to suffer greatly, with leaves covered in webs and turning inward, severely damaged leaves dropping from stems entirely, and new growth coming in stunted or deformed.
You may see all this and STILL not see any spider mites!! They are that small! One thing you can do to confirm your suspicions is the “paper test.” Spider mites like to congregate on the underside of plant leaves, where they go unnoticed, but a good flick of the leaf will often dislodge several of them.
Grab a blank sheet of white printer paper and hold it under your houseplant’s leaves. Gently tap a few leaves and take a look at the paper. If you see tiny green or brown dots littering the page (and sometimes even moving), you’ve got mites.
How to Treat Houseplants for Spider Mites
If your worst suspicions are confirmed, and you find yourself with a spider mite infestation, it is best to work quickly. Remember that although you may have just noticed your plant is in distress, it has been under attack from these pests for quite a while, so you don’t want to waste any time.
Luckily, you can employ plenty of treatment options to help knock back even the worst spider mite infestations. Also, because these pests carry out their entire life cycle on the plant, it simplifies the types of treatments you need to use to attack them at every life stage.
First Steps for Spider Mites
Before you consider what treatment options you might want to use, there are a couple of things that you should do right away.
First and foremost, quarantine your infested plant away from any other plants in your home. Dealing with one spider mite colony is difficult enough, so by isolating the plant, you can be sure you won’t spread them to other plants in your home.
Spider mites prefer warm, dry environments with low humidity levels, so try to find a place to quarantine your plant that is cooler and more humid. I find that a spare bathroom or the laundry room work well for this. The cooler temperature will slow down their growth cycle, and the humidity will discourage adults from spreading to new areas on the plant.
You may also want to make sure your plant has been properly watered. Again, dry environments help support spider mite populations, so by making sure your plant has been recently watered will help with the moisture, humidity, and overall health of your plant. The key word here is “properly.” Do not overwater your plant during an infestation. It will end up doing more harm than good.
Also, consider spraying down your plant with a sink, shower, or garden hose. Strong sprays of water can physically dislodge and remove a good portion of a spider mite population, making the remaining infestation easier to treat. Focus on spraying the underside of the leaves, which is where spider mites tend to gather.
Only spray your plant down if it is hearty enough to take it. Skip this step if you are dealing with a particularly delicate plant, since the water spray will likely do more damage than the spider mites.
Alternatively, you can wipe each and every leaf of your plant with a damp cloth to remove a good portion of the spider mite population. You aren’t going to get all of them, but this can greatly reduce the numbers you will need to treat for.
Once your plant is isolated, watered, and wiped down, you can start thinking about what treatment options will work best for your plant and home.
Soapy Water
Like so many other plant pests, spider mites do not do well when exposed to soapy water. The soap can remove protective waxy coatings that cause the mites to dry out and die.
Start by mixing dish soap in a spray bottle of water. Spray the entire plant, making sure to wet all areas, especially the undersides of leaves. This method only works with good contact, so be prepared to apply soapy water every few days until you no longer see any signs of mites.
Any missed areas on the plant will be safe havens for spider mites, and even just a few can reinfest the plant, so take your time and really make sure you are getting good coverage.
Rubbing Alcohol
Similar to soapy water, you can take it up a notch and use diluted rubbing alcohol as a foliar spray to kill spider mites. The alcohol in the solution will break down the exoskeletons of the mites, causing desiccation and death.
Start with a highly diluted mixture of one part 70% isopropyl alcohol to 20 parts water. This brings the alcohol content down to under 4%, which is typically safe to use on most houseplants. Spider mites are slightly tougher than some soft-bodied insects, so you may find you need a slightly strong mixture in subsequent applications.
If necessary, apply stronger alcohol mixtures, but test them on a small portion of the plant first to ensure it can handle the strength of your mixture. Again, coverage is key, so be thorough in your application, making sure to hit the underside of leaves.
You can also use rubbing alcohol on a damp cloth and wipe the plant down. This is another effective way of physically removing spider mites from the plant while also killing any stray mites that get left behind.
Insecticidal Soaps
If you are looking for a bit more oomph with your spray game, you can use insecticidal soaps to treat for spider mites. Similar to soapy water or an alcohol solution, insecticidal soaps work to disrupt the cell membrane and dissolve the cuticle of the pest, causing dehydration and death.
Insecticidal soaps are typically a mixture of fatty acids or potassium salts and water in a ready to use formula. Some products have other chemical additives that boast better efficacy but are often unnecessary. Even basic insecticidal soaps work well on mites and remain safe to use inside your home.
Even though they are relatively non-toxic products, always review the label for any insecticidal soap you plan to use to make sure it is listed for your houseplant variety.
Neem Oil (and Other Horticultural Oils)
Neem oil is nature’s gift that keeps on giving, often effective against a large variety of common houseplant pests, including spider mites.
Neem oil is a product derived from Neem trees and contains natural pesticide compounds that completely cover spider mites, suffocating them. Most Neem products come as ready-to-use mixtures that you spray directly onto your plant. Or, you can purchase Neem concentrate and dose out your own mixture, depending on the situation.
Like Neem, there are other horticultural oils that can be applied the same way, with similar results. They all work by coating pests and suffocating them. Apply Neem or other oils every five days or so to ensure good coverage and to treat for any spider mites that were missed or have hatched since the last application.
Diatomaceous Earth
Another great natural treatment for spider mites is diatomaceous earth. DE is made from the microscopic shells of tiny aquatic animals called diatoms. It creates a fine powder that, although soft to the touch for humans, is quite jagged and sharp for small, soft-bodied plant pests.
When DE comes into contact with spider mites, the tiny, jagged particles actually cut and tear apart their soft body parts, eventually causing death.
The one downside to using diatomaceous earth is that it is most effective as a dry powder, which makes applying it to an entire plant a bit of a chore. Using a shaker is a good way to distribute DE across the plant as you tip it in different directions. Alternatively, using a fine paintbrush to apply DE powder to the underside of leaves ensures good coverage, albeit in a somewhat tedious manner.
Rinsing your plant with water should easily remove diatomaceous earth from the foliage and should be done a few days after the initial application. You may find you need to repeat this treatment a few times to ensure all spider mites have come into contact with it.
Chemical Sprays
A really bad infestation may call for a stronger treatment option, which is where chemical sprays can be effective. Several different commercial formulas are sold at your local nursery or hardware store, so make sure you read labels carefully and pick one that is safe to use on indoor ornamentals.
Many chemical sprays contain active ingredients categorized as pyrethrins, imidacloprid, or pyrethroids, which vary in degree of toxicity. Pyrethrins are plant-derived insecticides and tend to be safer and more benign than other sprays, so I usually look for formulas made with them.
Spinosad
Another commercial product that can be very effective in the treatment of spider mites is Spinosad. Spinosad is actually a naturally-occurring soil bacterium that affects the nervous system of many different pests. It works by paralyzing the insect so it can’t move, essentially killing it within a matter of days.
Spinosad products are relatively harmless to mammals, including humans and domestic pets, but can still cause irritation if we come into contact with it, especially our eyes. It can also harm beneficial insects like bees, so you must be careful about how and where you apply it.
There are various spray formulas you can use, or even some powdered products that you just shake onto your plant.
Throw Your Plant Out
Lastly, if a spider mite infestation has gotten out of control, or it doesn’t look like your plant will bounce back easily, do not be afraid to throw it out. Sometimes the best thing you can do is just remove the problem and the potential for it to spread to other houseplants and start over.
If you do decide to ditch your infected houseplant, grab a large plastic bag and slip it over the entire plant before moving it. This will help keep the spider mites from spreading to other plants as you walk them out the door. Watch your other plants carefully for signs of spider mites, and once you’re sure the threat is gone, go out and get yourself a replacement plant.
Final Thoughts
Spider mites can be very frustrating little plant pests. Their tiny size helps them go unnoticed until you find yourself with a full-blown infestation and a plant that is declining fast. The good news is that there are plenty of treatment options that can take down a spider mite population fast.
The key is coverage! Be mindful of how you are applying a treatment; make sure you are covering all parts of the plant, and be prepared to repeat applications for as long as necessary. If you are consistent and thorough, spider mites don’t stand a chance in your house!