When your once-beautiful Bromeliad starts wasting away before your eyes, you’re faced with two burning questions: what’s happening to your plant, and what can you do about it? In this post, we’re going to try to answer both at once, walking you step-by-step through triage and treatment. If you follow this sequence carefully, you may be able to rescue even a severely sick Bromeliad.
Is Your Bromeliad Dying of Old Age?
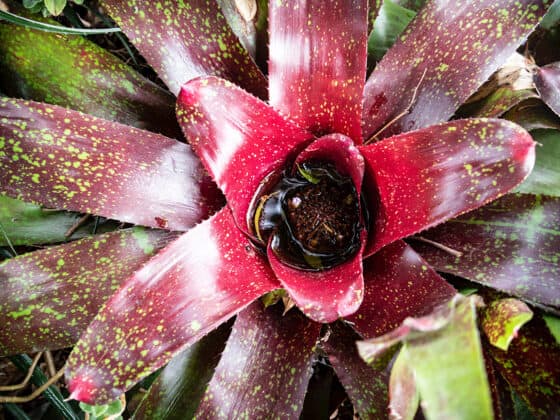
Before you rush to the rescue, it’s worth considering whether your plant is simply nearing the end of its lifespan. Most Bromeliads naturally start to shrivel up and die after they’ve produced one of their brilliant blooms.
How can you recognize a Bromeliad dying of old age?
- It’s already flowered once.
- Pups — smaller clones of the original plant — are growing from the sides of the main ring of foliage.
- Although the central plant is curling and fading, the pups look healthy.
There’s not much you can do about this, sadly. You can cut off and propagate the offsets, which will grow into beautiful plants in time. But the parent Bromeliad’s days are numbered no matter what you do.
Assuming you’ve ruled out this non-issue, here’s how to diagnose and treat a sick Bromeliad:
Step 1: Quarantine and Comfort Your Bromeliad
Until you know why your Bromeliad is dying, it’s best to keep it separate from your other plants. Some houseplant issues are contagious. If you can keep them isolated to just one plant, you can spare yourself a lot of trouble.
Place your Bromeliad in an area where it will receive no direct light — in other words, no sunbeams can fall directly on the leaves. The temperature should be between 60 and 75 degrees Fahrenheit. If possible, keep the air slightly moist, with a relative humidity of 55-65%.
If you water your Bromeliad through the “tank” formed by the leaves, empty it out for now. Standing water could complicate some of the treatment methods we’ll be describing below.
Sometimes this step is enough to start your Bromeliad on the road to recovery. If your plant was being damaged by too much harsh sunlight, moving it out of danger might be the only cure needed. Sunburn marks usually feel dry and crunchy, and they can vary in color from pale khaki brown to sooty black. They’re typically clustered on the upper surfaces of the leaves and the parts of your Bromeliad facing the closest window.
You should also take a look around the plant’s former location for things like leaky windows, heating vents, fireplaces, or air conditioning units. Exposure to too much heat or cold can stress your Bromeliad and damage its foliage.
Next Steps
- Even if you do find an obvious cause for your Bromeliad’s troubles, you should proceed to Step 2 to make sure there are no lingering issues.
Step 2: Inspect and Clean Up the Foliage
Many of the potential problems with your Bromeliad will be visible first and foremost from the condition of its leaves. Look them over carefully for discoloration, curling, dead spots, and other signs of damage or disease.
Be particularly watchful for symptoms of pest infestation. These can include:
- Visible bugs. The easiest ones to spot are scale, mealybugs, and aphids. Scale insects make your Bromeliad look like it has black, brown, or reddish warts. Mealybugs resemble small pill bugs covered in white fluff. Aphids look like tiny pear-shaped blobs that form big clusters on the leaves.
- Honeydew. This sticky fluid is excreted by all three of the insects listed above. It’s often colonized by charcoal-colored mold.
- Yellow stippling on leaves. The pinprick-sized scars left by spider mites can make the leaves look scuffed or dusty.
- Silver-gray patches or streaks. This may be damage caused by thrips feeding on the foliage.
- Dirty-looking cobwebs. Spider mites often spin webbing between the leaves.
- Salt-and-pepper dots or smudges. Thrips may leave a mixture of dark excrement and pale scarring on the leaves, while aphids can deposit flaky exoskeletons.
Prune off any of the leaves that are overrun with pests. You should also take off those that are completely withered or have large mushy and slimy areas. Don’t remove more than ⅓ of the foliage at a time, though. Make sure you disinfect your cutting tools with rubbing alcohol before every cut.
Leaves that are pitted with squishy yellow or brown blisters, or dotted with rust-red blotches, may have a fungal infection. In addition to clipping off heavily infected foliage, it may be a good idea to treat your Bromeliad with a non-copper-based fungicide.
Next Steps
- If you found evidence of pests, proceed to Step 3.
- Otherwise, skip to Step 4.
Step 3: Treat Your Bromeliad For Pests
Caring for a Bromeliad dying of parasites can be a complicated, frustrating process complicated. You may want to review our detailed article on the best treatment options before you get started. However, the following basic protocol is a good place to start, and it may be enough to cure your plant:
- Rinse the leaves with a strong spray of water to dislodge as many bugs as you can.
- Prepare a 1:1 mix of rubbing alcohol (70% isopropyl) and water. Add a drop or two of mild dish soap to help them dissolve. Use cotton swabs to wipe your plant down with this mix, making sure to coat every surface you can reach. Scale may need to be scraped off by hand.
- Spray your Bromeliad with a mild pest killer such as diluted neem oil or horticultural soap. An insecticidal oil might be necessary for treating scale. No matter what you use, get it into as many nooks and crannies as possible, including the spaces between leaves and the folds of the inflorescence.
- Wait for a week or so, keeping your Bromeliad out of direct sunlight.
- Repeat the steps above as needed until your plant is pest-free. This will almost always require at least two rounds of treatment, and sometimes several more. It’s often helpful to switch between different types of insecticides in case the bugs develop resistance to one of them.
The insecticidal treatments described above are usually safe for plants. However, there are many different kinds of Bromeliads, and some may be more sensitive to certain chemicals than others. It may be a good idea to test each one on a single leaf, waiting for a couple of days to see the effects before applying it to the entire plant.
Next Steps
- Sometimes problems like underwatering can contribute to pest issues. If you think that may have happened to your plant, proceed to Step 4.
- Otherwise, skip to Step 7 once your plant has no more visible pests.
Step 4: Check the Condition of the Soil
Some of the most common Bromeliad health issues can be traced back to soil moisture. A plant that’s not getting watered enough will start to curl, droop, and shrivel, especially in hot weather. Watering too often, or using a potting mix that’s too water-retentive, can smother the root system and invite fungal infections.
You can often tell the difference by poking the growing medium with your finger or sinking a moisture meter to the level of the roots. Dry, caked potting mix indicates dehydration (unless you water your plant by filling up the “cup” in the middle of the foliage). It’s usually also accompanied by wilting leaves with a crunchy, brittle texture.
Soggy, clingy soil often suggests overwatering, unless you just gave your Bromeliad a drink in the last day or two. These plants like a bit of moisture around their roots, but a totally waterlogged environment will choke off their much-needed oxygen supply.
It can also cause the plant’s leaves and roots to start decaying. Limp, mealy leaves may cause aBromeliad dying of rot to slouch to one side. The foliage might also turn yellow rapidly, beginning near the base of the plant and spreading upward. A foul smell coming from the soil, like mildew, vinegar, or sulfur, is another common sign of root rot.
Next Steps
- If the soil is dry, proceed to Step 5.
- If you see signs of overwatering or decay, skip to Step 6.
Step 5: Flush the Soil and Rinse the Plant
When your Bromeliad is suffering and the soil is dry, giving it a thorough soak may solve the problem. In addition to rehydrating your plant, this can flush out excess mineral salts left in the potting mix after fertilizing. Salt buildup is another common cause of dehydration, because it can block the roots from absorbing water effectively.
Pour a slow, steady trickle of water into your Bromeliad’s pot, letting it drip out of the drainage holes. Cover all sides of the plant, leaving no part of the root system untouched. Keep going for much longer than you would in a normal watering. Ideally, you should use enough water to fill up the plant’s pot four or five times over.
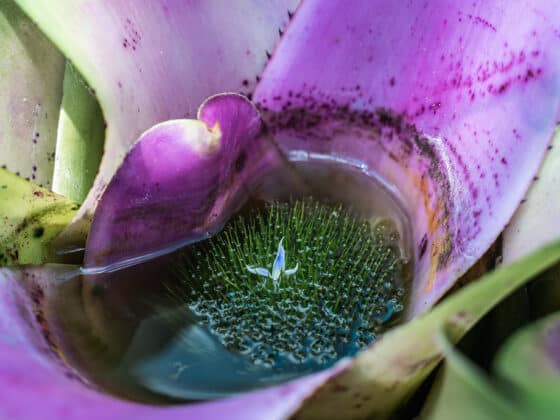
If you normally water your Bromeliad through the leaves — for example, if you have an Air Plant or an Urn Plant — rinse the foliage too. Pay special attention to the “well” at the center of the rosette. Minerals from fertilizer and tap water can accumulate there.
Next Steps
- Unless you have some reason to think there are additional problems besides dehydration, your Bromeliad should be okay within a few days. Skip ahead to Step 8.
Step 6: Treat Your Bromeliad For Root Rot
If you’re at Step 6, you most likely have a Bromeliad dying of root rot. However, to confirm this diagnosis, you’ll need to get a look at the root system. Grip near the base of the foliage rosette and tilt the pot over to slide the plant loose. Gloves are sometimes helpful, since many Bromeliads have spiky leaves.
You might find that the rot has already spread up to the plant. If the center of the stem has been eaten away, your Bromeliad is almost certainly too sick to save. All you can do is try to cut off and replant any healthy pups, then discard the plant. Otherwise, remove as many infected leaves as you can without stripping your Bromeliad bare.
Next, rinse off the roots so you can see them clearly. If they’re healthy, they should have an off-white color (sometimes stained a light reddish brown by the soil) and a firm, springy feeling. Rotting roots are dark brown or black and feel pulpy and soft when you squeeze them. They might also have a slimy coating.
Clip away every infected root you find, along with any that seem “iffy”. It’s better to prune a few healthy roots than to leave a few rotting ones and allow the disease to keep spreading. Always wipe down your pruning tools with sanitizer between cuts.
You can also dunk the base of the plant in a hydrogen peroxide solution. This should kill off any remaining microbes. Start with 3% hydrogen peroxide, the kind used in first aid. Mix one part peroxide into three or four parts water. Gently swish your Bromeliad’s root system in the liquid for a minute or two, then allow it to air-dry.
Next Steps
- Assuming your Bromeliad isn’t too rotten to salvage, you can proceed to Step 7.
Step 7: Repot Your Plant
Now it’s time to ensure that your Bromeliad has the kind of pot and soil it needs to thrive. Almost all of the problems described above will be made worse by improper potting mix. And some pests and diseases can continue to hide out in the soil, reinfecting your plant if you don’t repot it in a fresh growing medium.
The right mix for a Bromeliad should include a large fraction (more than 50% by volume) of coarse, rigid ingredients. You can see our detailed recommendations in this article, or simply use the following quick and easy mix:
- 1 part pumice or large-grain perlite
- 1 part orchid bark
- 1 part coconut coir
The type of container you use doesn’t matter much as long as it has plenty of drainage holes at the base. Houseplant owners who are particularly prone to overwatering might want to use terra cotta. This porous material helps the soil dry out faster.
If your plant’s old container fits the bill, you can reuse it. First, though, you should remove all the old potting mix. Then disinfect the pot by wiping down the insides with rubbing alcohol or a 10% dilution of household bleach.
Lightly moisten the potting mix and move your Bromeliad into the new container, heaping some soil around the base of the plant. It may be a little bit unsteady, especially if you’ve had to remove some of the anchoring roots. Stabilize it with some stakes if need be.
Next Steps
- You’re almost done! Move on to Step 8.
Step 8: Baby Your Bromeliad
After the stress of its illness, your Bromeliad will need some R&R. For the next 4-6 weeks, don’t do anything with it except tending to its basic needs.
Put your Bromeliad in a space where it will receive lots of bright, indirect light, but will be out of the direct glare of the sun. This generally means putting it at least 4 feet away from the light source (5-6 feet from south-facing windows). Provide the same mild temperature and humidity we described in Step 1.
Be careful to water your Bromeliad only when the potting mix has dried out to a depth of at least 2 inches. Alternatively, you can water it via the tank instead of the soil.
Don’t add any nutrients during the first month or so. After that, you should start reintroducing them slowly. Begin with a ¼-strength dose of a well-balanced liquid fertilizer. If your plant seems to tolerate that well, you can increase to a ½-strength dose the following month, then continue to fertilize your Bromeliad as normal.
Remain vigilant for any changes in your plant’s health during this recovery period. With luck, you’ll see it recover and start putting out new, healthy foliage within a few weeks.
A dying Bromeliad would make almost any houseplant lover nervous, but try not to get too discouraged. They’re fairly tough plants, and there’s a good chance you can save yours with steady, attentive care. We hope your Bromeliad gets well and gives you many more years of beauty and joy.