Like many houseplants, Calatheas can easily be propagated by dividing one plant into several smaller clones. It’s a fast and inexpensive way to expand your collection, produce new plants for sale, or create a gift for a foliage-loving friend. Of course, if you know how fussy these tropical princesses can be, you’ll want to make sure your technique is on point when you try to split yours.
Water your Calathea thoroughly a day or so before dividing, giving it some hydration to hold it over. Uproot the plant, clean off any excess soil, and gently work the root mass apart with your thumbs. Look for natural divisions in your Calathea’s root ball – there are likely to be distinct clusters of roots and stems that will be easier to pry apart.
Plant your newly divided Calatheas in soil with good drainage and keep them in a warm spot away from direct sunlight. Take extra care to ensure they have enough humidity but aren’t overwatered, and within a few weeks, they’ll be growing happily. Read on for more detailed instructions on successfully propagating Calatheas from division.
Why Divide Your Calathea?
There are several good reasons you might want to split up your Calathea. The first is simply that you want more of them. Once you’ve fallen in love with your first Calathea, you might want to spruce up a few other rooms in your home with the same lovely foliage. You might also want a few extras to give away to your friends and family – or to sell on Etsy.
Division at the root ball is by far the easiest way to multiply or propagate Calatheas. The alternative is growing them from seed, but this is extremely time-consuming and often proves futile since these plants rarely flower indoors. Dividing your Calathea also ensures that the new plants will be genetically identical – technically, it’s a form of cloning that doesn’t require any fancy lab equipment.
You might also want to split up your Calathea if it’s grown too big for its pot and become root bound, meaning its roots are tangled in a dense knot that limits the plant’s ability to take up food and water.
It’s not always easy to spot a root bound plant without pulling it out of the pot because the symptoms look much like dehydration. If your Calathea’s growth is stalled and it appears shriveled or droopy – and you’ve ruled out problems like underwatering and root rot – it may be overgrown. Roots emerging from the surface of the soil or the drainage holes in the pot are a dead giveaway that your plant is root bound.
One option is to simply repot the plant into a bigger container, but some growers prefer to split up their Calathea rather than continuing to buy larger pots. Dividing the plant periodically keeps its size in check.
You might also simply be the kind of indoor gardener who delights in experimentation. Sometimes the excitement of learning and applying a new plant care trick is reason enough!
When to Divide Your Calathea
Any time you disturb your Calathea’s roots, you’re taking a risk. These plants don’t always survive the stress of being uprooted. However, they also won’t survive sitting in the same pot until their roots are choked off by lack of space. Pulling your Calathea out and repotting every so often is a necessary evil, whether you’re putting it in a bigger container or splitting it to keep it at a manageable size.
To avoid stressing the roots too often, you should divide your Calathea at the point where you’d need to repot it anyway: roughly 1-2 years after the previous repotting, depending on how fast it’s growing.
The best time of year to divide or repot is the spring when your plant is beginning to put out new leaves. In the winter, your Calathea’s growth usually slows down or stops due to reduced light and humidity. That hampers its ability to sink its roots into a new container.
How to Divide Calatheas, Step by Step
Splitting your Peacock Plant may sound like a daunting task, but it’s actually quite simple. Follow this easy guide, and you’ll soon have a batch of healthy Calathea clones.
Step 1: Prepare Your Plant and Your Tools
Water your Calathea thoroughly the day before you divide it. Its roots won’t be operating at full strength after the operation, so you want it well-hydrated before you start. Soak the soil evenly until you see water draining out the base of the pot.
Then gather your supplies. Here’s what you’ll need:
- Potting soil. Calatheas do best in a mix that combines absorbent organic matter with lots of coarse rock or bark to space out the medium. A blend of 40% coconut coir, 40% coarse perlite, and 20% African Violet potting soil should do the trick. We have more detailed instructions in our article on Calathea pots and soil.
- Pots. The number and size will depend on how many times you intend to split your plant. Make sure the containers you choose have openings at the base for drainage.
- Pruning shears. These may not be strictly necessary – it’s often possible to separate Calatheas with your bare hands – but if the root mass is especially thick or tangled, it’s often easier to just slice through it. A sharp set of kitchen scissors will also work.
- Disinfectant. If you do need to cut your Calathea’s roots apart, you should sanitize the blades first. A mix of 1 part bleach and 9 parts water is a good choice, as is ordinary isopropyl alcohol.
- A bin, mat, or towel. Again, not actually necessary, but when the soil starts crumbling off of your Calathea’s roots, you’ll probably want something to keep the mess contained.
Step 2: Fill Your Pots
Sprinkle some water onto the potting mix you’ve prepared, just enough to make it a little damp when you stir it up. Then scoop it into the new pots, filling the bottom ⅓ or so. Pat it down slightly, enough to settle the soil in without compacting it.
Step 3: Uproot Your Calathea
Grip your plant by the base of the stems and tip the pot on its side to slide it out. You might need to smack the base of the container a few times to free the root mass. If any roots are snaking out of the drainage holes, try to move them so they don’t keep your Calathea stuck.
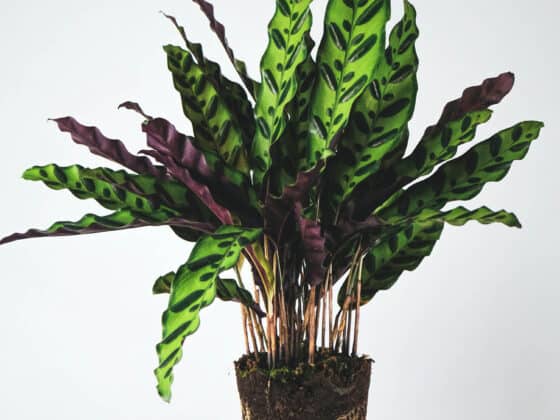
Start clearing the excess potting mix off the root mass, brushing it away gently so that you can get a good look at the roots. You may notice some lumpy tubers. Don’t worry, your Calathea doesn’t have goiters – those are rhizomes, specialized root structures for storing energy, and they’re actually a sign of good health.
Step 4: Inspect the Roots
Take this opportunity to look for signs of poor health. Root rot turns your Calathea’s roots gray, black, or dark brown, and changes their texture from firm to squishy and slimy. Fertilizer burn causes them to dry out and shrivel up, turning crispy and brown.
If you do see root rot, snip away any and all infected tissue. Wipe down the blades of your cutting tool with disinfectant before and after each cut. Otherwise, you could spread bacteria to the healthy roots.
Step 5: Separate the Roots
Look for natural divisions within your Calathea’s root mass. You should be able to spot some areas where distinct groups of stems are emerging. Pick one of these divisions and grip the roots on either side. Then work your thumbs in between the two halves and start prying them apart.
Be firm, gentle, and patient. Calathea roots are slender and fragile, and while it’s impossible to avoid damaging some of them, it’s best to leave as many intact as possible. Tug them apart slowly with your hands as you use your thumbs to widen the space between them.
If you run into a root that’s putting up strong resistance, don’t pull too forcefully, or you may snap off the stems. Instead, disinfect your shears and snip the obstinate root apart.
Step 6: Repeat as Needed
You can keep on dividing your Calathea as many times as you want, provided that each new clone has at least a few intact roots, leaves, and stems.
Step 7: Transplant
Now it’s time to place your baby plants in their cribs. Set each one into a new pot and fill in the space around the roots with potting mix. Tamp the soil down to keep your Calatheas in place, but don’t compact it too firmly.
Bury each plant to the same depth as it sat in its previous life. Then give your Calatheas a light watering.
Caring For Your Clones
You’ll need to pamper your new Calatheas even more than usual after you divide them. They’ll be in a very fragile state as they work to get their root systems established in their new homes.
Keep the transplants in a space that will remain above 65 degrees Fahrenheit, and don’t let them sit in direct sunlight. They don’t like to sit in the dark, though – bright, indirect light is key (see our article on Calathea lighting for more detail).
Be very careful not to overwater during this transitional stage since the roots will be extra-vulnerable to the microbes that grow in soggy soil. Give your plants more to drink only when the top 2 inches of soil in their pots have dried out.
On the other hand, you should be extra-generous with humidity as your Calatheas try to grow back their roots. If you don’t already have a humidifier for your plants, this may be the time to invest in one. Covering them with clear plastic bags can also help them retain heat and moisture while still receiving sunlight.
Once you see new leaves popping up on your clones, you’ll know they’ve bounced back. This typically takes between 2 and 4 weeks. At that point, it’s safe to take them out of the bags – though keep in mind that Calatheas always appreciate plenty of humidity.
Final Thoughts
Patience and care are the keys to successfully dividing Calatheas – be gentle while peeling the roots apart, and provide tons of TLC as your clones recover. Now that you know the technique, you can get your hands into the roots and start practicing your propagation skills. Before long, you’ll have enough Calatheas for every friend who oohs and aahs at your collection.