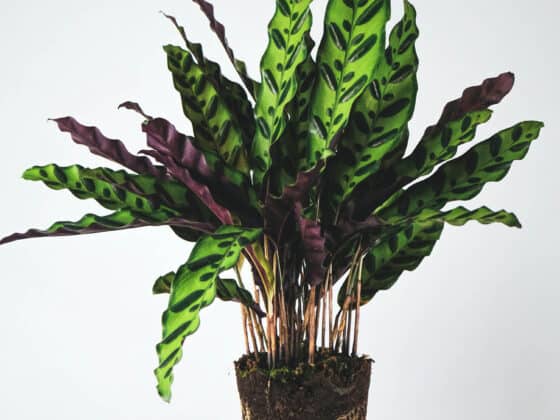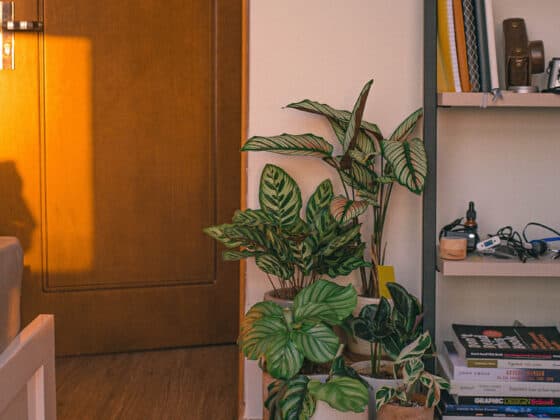
Some houseplants are prized for their flowers or their pleasant scents, but with Calatheas, the vivid foliage is the star of the show. And unhealthy or damaged leaves are a major source of stress for their devoted owners. We’ll identify the various problems that can afflict your Calathea’s leaves, then talk about how to prevent them and restore your plant to health.
So, what’s wrong with your Calthea’s leaves? Many Calathea leaf problems, including discoloration, curling, or drooping, can be brought on by various stressors. Browning and crisping leaves, for instance, result from dehydration – but that could be brought on by lack of humidity, improper watering, or damage to the roots from excess fertilizer.
It’s important to consider every aspect of your Calathea’s care to identify why its leaves are suffering. The most crucial factors in keeping your Calathea’s leaves happy are proper soil and proper sun. Provide a potting mix that’s chunky and well-aerated, and water just enough to keep the soil around the roots mildly damp. Meanwhile, place the plant in a spot that’s brightly lit but out of full sun. Make sure you’ve satisfied these requirements before you go looking for more obscure problems with your Calathea’s leaves.
Calatheas: Beautiful, But Fickle
It’s easy to feel like a failure as a plant parent when you see signs of unhappy leaves. But we’re here to tell you: don’t beat yourself up. Calatheas are just plain difficult.
In fact, it’s kind of amazing that they remain so enduringly popular, considering all the grief they give their owners. Calatheas are notorious for curling up and turning brown at the slightest provocation, often sulking for weeks after being moved from one pot to another or having their lighting conditions changed.
So if you’ve recently made any change to your Calathea’s environment – even if it’s a change that will make it healthier in the long run – your plant might simply be acting out. There’s a chance it will perk up on its own in a week or two.
On the other hand, stressed leaves can also be a sign of more persistent health issues. Let’s review some common Calathea leaf problems and explore what’s behind them.
Calathea Leaves Turning Brown
As we’ve already explained, Calathea leaves become brown, crispy, and brittle because the leaf’s tissues are drying out; the cells in their foliage need moisture to remain plump and flexible. But there’s a surprisingly long list of issues that can cause parched leaves in a Calathea.
Lack of humidity. Calatheas evolved in the misty jungles of the tropics and often find the air in our homes rather dry for their moisture-loving leaves. The drier the air, the more quickly a plant loses water to transpiration, the process by which vapor escapes from the tiny pores in the leaves.
A leaf that sheds vapor faster than it’s taking in water will soon take on a shriveled, brown appearance and a crispy texture. Keep the ambient humidity at 60% or higher if you want your Calathea’s foliage to stay lush and green. A humidifier is the best way to achieve this, although grouping your moisture-loving plants close together and setting them on pebble trays can also help.
Sun scorch. This is precisely what it sounds like. Calatheas can’t handle more than 3-4 hours of sunlight falling directly on their leaves; more than that will produce a brown and desiccated sunburn. Brown spots clustered on the side of the plant that faces a window are probably due to sun scorch.
Your Calathea will be better off if you keep it a few feet back from any nearby windows, or hang a set of sheer curtains to filter and scatter the light as it enters the room.
Browning Leaf Tips on Calatheas
If the crisping on your Calathea’s leaves is concentrated at the tips, you still have a dehydration issue, but it’s likely originating at the plant’s roots rather than the leaves themselves. When the root system is damaged or deprived of water, the parts of the plant that are farthest from their source of hydration run dry first. The result is brown, dead tissue at the tips and edges of leaves.
So what might be starving your Calathea’s roots of water?
Underwatering. This is the most obvious way to dehydrate your plant. It’s never a good idea to let your Calathea’s roots dry out completely; these thirsty plants wilt and fade quickly. If the soil has turned dry and started to peel back from the edges of the pot, you’ve almost certainly waited too long to water.
Check your Calathea’s potting mix every few days by poking it with your finger, a
If underwatering is the issue, you’ll probably see your plant’s leaves and stems drooping before they begin to get discolored. Take that warning sign seriously, and try to avoid letting it get to the brown-tip stage.
Water quality. Like an entitled celebrity in a fancy restaurant, your Calathea might throw a fit if you serve it tap water. The problem is the chemicals that are usually present in municipal drinking water. In many regions, tap water is “hard,” meaning it has high levels of magnesium, calcium, or other minerals. Even in places where the water isn’t particularly mineral-heavy, it’s likely been treated with chlorine to kill bacteria or fluoride to promote dental health. These chemicals are often too harsh for Calatheas.
When these chemicals accumulate in the soil, they make it harder for the roots to take up water. This is a problem that can affect any plant, but Calathea roots are particularly vulnerable to chemical stress. Give your plant filtered or distilled water to sidestep this issue. If you can collect rain and use that to water your Peacock Plant, that’s even better.
If you think your Calathea’s leaves are browning due to poor water quality, it’s a good idea to flush its pot thoroughly, washing the minerals out of the soil. Pour distilled water into the pot, soaking the soil thoroughly and letting the excess liquid trickle out of the holes at the bottom. Keep going until you’ve rinsed the pot with 3-4 times its total volume.
Excess fertilizer. Hard water isn’t the only way that minerals can get into your Calathea’s pot. Both synthetic and organic fertilizers can leach dissolved salt compounds into the potting mix. If you give your plant more nutrition than it can use, the rest will hang around in the soil, potentially forming an obstacle to healthy root function.
If you’re going to fertilize your Calathea, use a relatively mild dose. Once a month or so, give it some liquid fertilizer with a 3:1:2 ratio of nitrogen, phosphorus, and potassium. You might consider starting with a ½ or even ¼-strength dose before scaling it up if the plant seems to need it.
Also, never fertilize when the plant isn’t getting enough light to produce new growth – that means the fall and winter months, unless you’re using grow lights. Flush the pot every 1-2 months while using fertilizer, using the method we described in the section on water quality.
Overwatering. Weirdly enough, too much water can be even worse than too little when it comes to maintaining a healthy plant. That’s because roots need some oxygen to function, which they normally draw from tiny air pockets in the soil. When your Calathea’s pot is utterly drenched, the water fills in those little gaps and starts to choke the roots.
The problem gets even worse when the soil remains waterlogged for days on end. This kind of environment encourages fungi and bacteria to breed rapidly until they begin to invade your Calathea’s roots, rotting the plant from the bottom up. Once it begins, root rot can spread quickly and kill a Calathea in a matter of weeks.
When you notice browning tips on your Calathea’s leaves, check its pot. If the upper layers of the potting mix are still damp, or the region around the roots is sopping wet, you probably have an overwatering issue. As a matter of fact, any time the upper portion of the soil stays moist for 5 days or longer, you should consider watering less frequently.
If root rot has set in, your plant needs immediate and drastic treatment. Check your Calathea’s root ball for mushy, slimy, gray, or black spots. Any roots showing any of these signs are infected. Remove them immediately with disinfected shears.
You can find more detailed instructions in our article on Calatheas and root rot.
The best way to avoid overwatering your plant is to root it in a coarse and airy potting mix that will keep water from pooling in the pot’s base. (And don’t forget that your container must have a drainage hole!) Try the following recipe:
- 40% coco coir. Also known as coco peat, this loose, fluffy substance will retain enough water to keep your Calathea’s roots damp without smothering them.
- 25% perlite. This is a porous mineral that helps to space out the mix and provide structure. Unlike organic ingredients, it won’t decay and turn mushy over time. Use a fairly coarse grade.
- 25% orchid bark. These thick chunks of conifer bark are also good for aeration, plus they help keep the pH a bit south of neutral, which Calatheas appreciate.
- 10% vermicompost. Worm castings help make the soil structure porous at the micro-level while serving as an organic nutrient source.
Can You Fix Brown Leaves on Your Calathea?
Any leaf tissue that’s been damaged by dehydration is going to stay brown and shriveled, even after you resolve the problem that caused it. However, if you’re bothered by the unsightly look of crisping leaves, you can trim off the dead portions.
Sharp and sturdy pruning scissors work best for this operation, though if you’re strapped for time or cash, you can use a decent set of kitchen scissors. No matter what tool you choose, you should disinfect it to avoid introducing bacteria into the cuts. Wipe the blades with isopropyl alcohol or a 10% dilution of bleach.
Leave any undamaged portions of the leaves unless you really can’t stand how they look after you’ve removed the brown parts. This healthy tissue can still capture energy from photosynthesis; if you take it off, you may slow down your Calathea’s growth.
Pale or Yellowing Calathea Leaves
This is another tricky symptom that can crop up due to several different issues. Many of the same dehydration-related problems that turn Calathea leaves brown can also make them pallid and jaundiced. Overwatering, in particular, tends to cause the foliage to turn yellow, usually beginning with the lower leaves and working slowly upward.
If your Calathea’s leaves are fading to yellow or white, take a look at the problems we’ve listed above and see if any of them fit the bill. If not, here are a few other possibilities.
Natural aging. With proper care, your Calathea can live for many years, but the individual leaves have shorter lifespans. It’s normal for them to fade, wither, and drop off the plant after a while.
If only one or two leaves are yellowing, don’t sweat it – especially if they seem to be the leaves that have been on your plant the longest.
Temperature issues. Calatheas come from the tropics, and they don’t do so well in frosty weather. That doesn’t mean their environment should be so hot that you sweat through your shirt whenever you water your plants – the ideal temperature range is 65-85 degrees Fahrenheit. If your Calathea falls below 55 degrees, its leaves may start to turn yellow and die.
Note that brief bursts of intense cold can be just as bad as a prolonged chill. A Calathea placed by a drafty window in an otherwise warm room can suffer from temperature shock when the chill wind hits it.
As with watering, too much heat can cause the same problems as too little. A Calathea that’s kept next to a radiator, fireplace, or central heating vent is apt to turn yellow and drop leaves.
Lack of light. We warned you about the risks of exposing your Calathea to bright sun, but it’s also possible to under-light your plant. If the room where your plant lives is so dim that you couldn’t read a book there during the daytime, it probably needs more light. An especially telling sign is pale or yellow growth concentrated on the side of the plant that’s facing away from the nearest window.
Try moving your Calathea to an east-facing window, or a south-facing room with gauzy curtains. Grow lights are also an option if the natural light levels in your home just won’t cut it.
Nutrient deficiency. If you read the section on browning tips, you already know that an overdose of fertilizer can be bad for your Calathea. Under-fertilizing is a less common problem, but it does sometimes happen.
A Calathea that stays in the same pot for a long time will eventually consume all of the nutrients mixed into the potting soil. If you don’t start supplementing with added fertilizer, the plant will no longer have enough of the chemicals it needs to build and maintain its leaves. Yellow or pale foliage is one way this problem can manifest.
Try to eliminate every other possible issue before adding fertilizer to your Calathea – excessive nutrition is much more dangerous than a shortfall.
Leaf Scarring in Calatheas
What if, instead of turning uniformly pale, your Calathea’s leaves appear to be covered in tiny white or yellow speckles? In that case, we have some bad news: your plant has cooties. Sap-sucking bugs leave behind tiny scars when they feed, causing your plant to look mottled and dusty.
The usual suspects are spider mites, the most common Calathea pests by a landslide, but thrips or aphids can also cause this type of damage. Regardless of what’s attacking your plant, there are a few crucial steps to take:
- Quarantine. Move your plant away from any others that could pick up an infestation.
- Amputate. Snip off any leaves that are too chewed up to survive. This will free up some energy for your plant’s recovery.
- Treat. Spritz the plant down with water mixed with a small amount of dish soap, rubbing alcohol, hydrogen peroxide, or neem oil.
- Clean. Wipe the stems and leaves down with a cloth or brush dipped in the same pesticide you used on the leaves.
- Repeat. Pretty much any infestation will require multiple treatments to clear up. Repeat the spraying and wiping every 3-5 days. For best results, alternate between a few different treatments – for example, first neem, then rubbing alcohol, then peroxide.
Refer to our article on Calatheas and spider mites for more detailed instructions.
Holes in Calathea Leaves
Holes in Calathea leaves are a relatively rare problem, especially for indoor plants. The most common culprit is severe sun scorch. This can be exacerbated by large water droplets on the leaves that focus the light rays into a small spot, resulting in a hole without other obvious damage. If you mist your Calatheas, use a fine droplet setting and try to avoid letting it sit in a sunbeam immediately afterward.
Pest damage is another possibility, though the kinds of insects that munch holes clean through a leaf are relatively rare for indoor plants. Big, irregular holes could be the work of caterpillars or slugs. These attackers can be chased off by occasionally treating the plant with neem oil; see our article on how to use this natural pest repellent on Calatheas.
Mechanical damage while new leaves are forming can also sometimes leave holes. For example, you might accidentally poke the side of a young leaf with your scissors as you’re trimming away dead growth. This will leave behind a neat row of holes once the leaf matures and unfurls.
Small or Stunted Calathea Leaves
Another potential issue is new leaves that are small or misshapen when they emerge. Some of the conditions we’ve addressed above could be responsible:
- Dry air or underwatering can easily stunt your Calathea’s growth
- Nutrient deficiencies often result in deformed leaves
- Pest problems may interfere with healthy leaf development
That said, there is one other possibility to consider:
Cramped roots. When a Calathea has outgrown the space in its pot, the roots begin to double back on themselves, circling and twisting into a tight clump that doesn’t let in enough water or nutrition to keep the plant healthy. This can stunt any new growth your Calathea tries to send out.
If you’ve left your plant in the same pot for 2 or 3 years, it might be root bound enough to hamper growth. Look for roots pushing up from the soil or creeping out of the drainage holes in the pot – these are sure signs that your Calthea is desperate for space. The only cure is repotting.
Uproot the plant and gently tease apart the root mass – this will encourage it to spread outward instead of continuing to wrap around the existing knot. Then transplant your Calathea into a pot that’s a couple of inches larger in diameter.
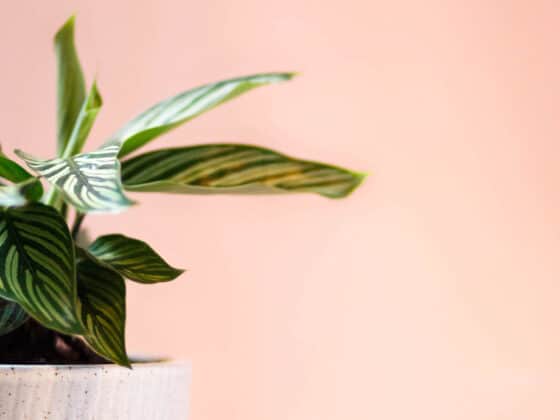
Faded Patterns on Calathea Leaves
Sometimes a Calathea’s leaves appear mostly healthy, but their normal vivid patterns begin to lose their bold contrast. This is almost always a lighting issue.
Mild sun scorch can cause a Calathea’s leaves to look washed-out even if they’re not burned badly enough to turn brown. On the flip side, inadequate lighting may cause the plant to produce extra chlorophyll to soak up as much sun as possible. That can make the leaves too dark for their patterns to stand out.
Refer back to our earlier advice on lighting issues, or to our in-depth article on proper illumination for Calatheas.
Final Thoughts
There’s no one-size-fits-all approach to diagnosing leaf problems in Calatheas. You’ll have to take a complete inventory of the plant’s growing conditions, from the soil in which it sits to the amount of light and water it receives. When you find the factor that’s out of balance, you can start restoring your Calathea’s leaves to their former glory.