Any experienced Bromeliad owner will tell you that fungal infections from overwatering — often called root rot or crown rot — are one of the biggest threats to your plant. But don’t despair if you’re worried that you’ve given your plant too much to drink. In some cases, you can save an overwatered Bromeliad, though you’ll need to move fast. The more the infection is allowed to progress, the harder it will be to rescue your plant.
Remove your Bromeliad from the pot and snip off any squishy, slimy, or discolored roots and leaves. Then, plant it again in a sanitized pot with fresh, fast-draining soil. If you’re unable to save an overwatered Bromeliad but it has healthy pups, you can try splitting them off and replanting them.
Because overwatering is so deadly to Bromeliads, avoiding it is a much better plan than trying to cure it. We’ll provide some key techniques for preventing root rot in the article below. You’ll also learn how to recognize root rot and how to distinguish it from several other common plant problems. With diligent care, you may be able to avoid the issue completely.
Why Overwatered Bromeliads Are So Common
Bromeliads can be a bit more vulnerable to rot than other kinds of plants. Many species within this plant family have evolved to live in trees (epiphytes) or on rocks (lithophytes). Their roots are shallow and often used mostly to hold the plant in place, with little ability to absorb water.
As a result, they may not drain moisture from the soil as quickly as the roots of other houseplants. A Bromeliad’s potting mix may remain damp for longer than you’re used to, increasing the risk of fungal infections.
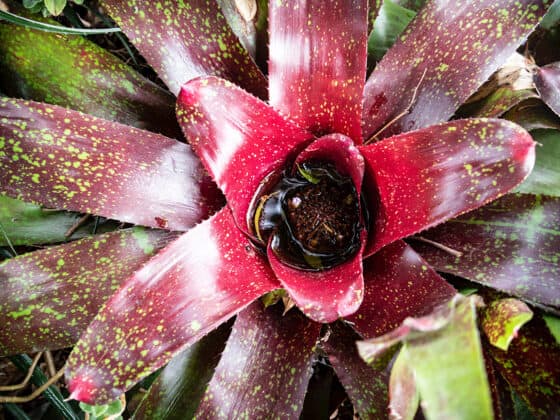
At the same time, most Bromeliads don’t have an elongated stem. Instead, each plant sprouts a round rosette of leaves (known as its crown) more or less directly from the roots. Since the leaves are so close to the ground, they can easily develop rot from contact with overwatered soil. And a decaying crown is even more deadly than decaying roots — this condition can damage a Bromeliad beyond repair in a matter of days.
These two factors make overwatering the single biggest threat to indoor Bromeliads. Many growers have been blindsided by the speed at which soggy soil can kill these plants.
How to Prevent Crown and Root Rot in Your Bromeliad
The best way to deal with rot is to stop it from ever developing. You don’t have to save an overwatered Bromeliad if you never overwater!
Here are a few tips to help ensure your plant is properly watered:
Let the Soil Dry Out
Most Bromeliads can tolerate mild droughts quite well. Don’t be afraid to let the potting mix lose most of its moisture before you water your Bromeliad. Use your finger or a moisture meter to test the top two inches of the soil every week. If it still feels damp, wait a few more days and check again, watering only when this layer of soil is dry.
Give Your Bromeliad an Appropriate Potting Mix
The fungal and bacterial species that cause root rot thrive in moist, low-oxygen environments. You can help repel them by choosing a growing medium full of air pockets. At least 60% by volume should be composed of large, rigid particles that won’t decay quickly. Good examples include:
Use the Urn
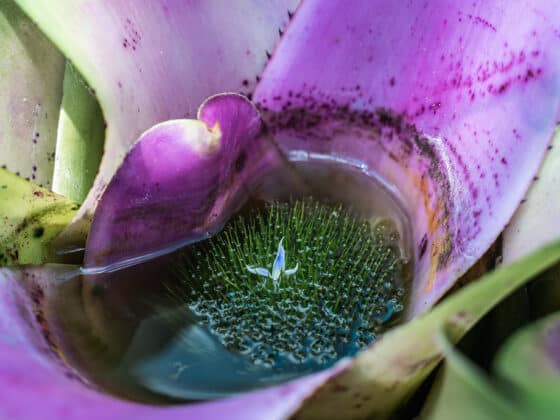
Many Bromeliads have a natural chamber at the center of each rosette, where the leaves slope down sharply. It’s typically called an urn, vase, tank, cup, or well. This adaptation is used to catch and store water in the wild, and it can serve the same purpose in your home. Keeping the urn at least ⅓ full of clean water, while watering the soil only sporadically, can help your plant stay hydrated while reducing the risk of rot.
Clean Your Bromeliad
If you do water your Bromeliad in its central vase, make sure you change it out frequently. Standing water eventually loses all of its dissolved oxygen, creating the same damp, airless conditions that enable fungal growth in overwatered soil. Rinse your plant’s “tank” out thoroughly and refill it every one to two weeks. If you add fertilizer to the water, a weekly rinse is best.
Provide Lots of Light
Some Bromeliads do poorly in the harsh glare of the sun, but that doesn’t mean they prefer dim lighting. Most of these plants like their light bright but indirect, meaning it’s bounced off of walls or filtered through a wispy curtain. More sunlight means less chance that the soil will remain wet long enough to cause rot. That means lower odds that you’ll have to save an overwatered Bromeliad.
Water Less When It’s Cold
The advice above about testing the soil weekly applies mainly to the growing season (spring and summer). During the colder months of the year, your Bromeliad won’t grow, so it won’t use as much water. You can test the soil moisture levels about half as often and err on the side of letting it get dry.
Recognizing an Overwatered Bromeliad
Diagnosing root or crown rot in time to take action is often the most important factor in rescuing it. How do you know when you need to save an overwatered Bromeliad?
The most important thing to watch for is prolonged dampness in the pot. Overwatering means the soil has been wet for too long, not that you added too much water at once. You should be concerned if:
- The top of the soil stays glistening wet for more than a day or two
- The soil remains visibly damp for more than a week
- The upper 2 inches of the soil are damp for more than two weeks
Those are guidelines, not fixed rules. Bigger pots normally take longer to dry out than smaller ones, and large, fast-growing Bromeliads may drain the soil faster.
Other possible signs of overwatering include:
- Slow, stunted growth
- Rapid yellowing of the foliage
- Brown spots or streaks in the leaves
- Limp, soft, wilting foliage
- Funky smells from the soil or leaves, such as alcohol, rotten eggs, or mildew
- Loose leaves that pop off with little resistance
Leaves turning yellow or brown can be a symptom of many different problems, but a yellow color spreading quickly from the base of the plant upward often signals overwatering. The same goes for discolored leaves that feel mushy and limp instead of stiff and crispy. An overwatered Bromeliad will often slump over to the side. This can indicate that rot is softening the tissues so much that the plant can no longer stay upright.
Remember that a Bromeliad could have crown rot even if it doesn’t have root rot. If you’ve been keeping water in the plant’s “tank” and not changing it regularly, it could still be “overwatered” regardless of how dry the soil is.
Overwatering vs. Senescence in Bromeliads
If you’re seeing a few brown, dying leaves at the outer edges of your Bromeliad, but new foliage is forming at the center, there may not be an issue. It’s likely that the dying leaves have simply reached the end of their lifespan and are being replaced by fresh ones. This is called leaf senescence.
Senescence can also happen on the scale of the entire plant. Most Bromeliads only flower once in their lives, then slowly die while forming younger clones to carry on the cycle. If you see healthy-looking “pups” appearing around the edges of a withered plant, there’s a chance that it’s dying of old age rather than excessive hydration. It’s still probably a good idea to uproot it and see for yourself, though.
How to Save an Overwatered Bromeliad in Five Simple Steps
Once you’re fairly sure that your Bromeliad is overwatered, it’s important to act quickly. If your diagnosis is wrong, the treatment likely won’t kill your plant. But if you’re right and you delay too much, your Bromeliad may not survive.
Step 1: Get Supplies Together
The following materials are crucial when it’s time to save an overwatered Bromeliad:
- Potting mix. You’ll need to throw out the soil in which your plant is currently growing. It’s likely full of hostile microbes that could re-infect your Bromeliad. Take a look at this article for recommendations.
- Scissors. We like these fine-bladed pruning snippers from Fiskars.
- Sanitizer. To disinfect your scissors, you can use rubbing alcohol, hydrogen peroxide, or bleach mixed with water in a 1:10 ratio.
These supplies are optional but often a good idea:
- Gloves. Many Bromeliads have spikes on the edges of their leaves. Garden gloves can help you handle them safely.
- Hydrogen peroxide. Even if you use something else to disinfect the blades, hydrogen peroxide can help clean the roots.
- Cinnamon. This chemical has natural fungus-killing powers. It can be helpful when you don’t have hydrogen peroxide handy.
- A new pot. You can reuse the old container if you clean and disinfect it thoroughly, but some people prefer to use a fresh one. This may be a good idea if your old pot had poor drainage (a common cause of overwatering). Terra cotta pots are particularly helpful for avoiding root rot because they’re so porous.
On the other hand, you should avoid using a copper-based fungicide. Copper ions in large quantities can be lethally toxic for Bromeliads.
Step 2: Uproot Your Overwatered Bromeliad
Gently grip your Bromeliad around the base and lift it out of the soil. If it’s gotten tight in its container, you may need to squeeze the sides of the pot or smack it sharply on the underside to jog it loose.
On the other hand, you may discover that it offers nearly zero resistance as you lift it, because the roots are gone. (This is usually a sign that your diagnosis of root rot was spot on.) If not, rinse the roots off gently with some water until you can see them clearly.
Step 3: Inspect Your Plant
Now, you’ll need to determine the extent of the damage.
Look for any areas that look brown or black, or feel slick and squishy. These are indicators of rot. Healthy Bromeliad roots are firm and white or tan (when not covered with dirt). Leaves can come in a variety of colors and patterns depending on the species, but irregular patches of soft brown tissue spell trouble.
At this point, you might discover that the decay has spread too far to be fixed. It’s usually impossible to save an overwatered Bromeliad if the center of the foliage rosette has rotted all the way through. In that case, your only option is to chop off any healthy pups for propagation and throw the rest away. However, if there’s still some healthy plant matter in the middle, your plant might be salvageable.
Step 4: Clean Up Your Bromeliad
Remove every last bit of rotting material you can find from your plant. This is no time to be timid because any diseased tissue that remains can continue to harbor the disease. If you’re uncertain whether a particular section of a leaf or root is infected, get rid of it.
Before each cut, wipe down the blades of your pruners with whatever disinfectant you selected. This will keep you from spreading spores and fungal cells to healthy parts of your Bromeliad.
Once you’re done removing any obviously infected tissue, you might also want to use a fungicidal agent on the base of the plant and any remaining roots. If you have hydrogen peroxide, you can dilute it in water, 1 part peroxide to 3-4 parts water. Then, swish the roots and the underside of your plant in this mixture and let it dry. Or you can dip the plant in a shallow bowl of cinnamon.
Step 5: Repot Your Bromeliad
As noted above, you’ll need to get rid of all your old potting mix, and you might also want to ditch the old pot. If not, wash it out with soap and water, then wipe down the inside with the same disinfectant you used on your scissors.
Moisten your potting mix lightly. It should feel about as damp as a sponge that’s been thoroughly squeezed out. Then, fill up your clean pot, leaving a little room for your plant and its remaining roots.
Set your Bromeliad down in the container and cover the roots with a little more potting mix. Once it’s good and stable, move it to an area where it can receive bright light but no direct sun. Let it stay there for the next couple of weeks. You might also want to place a humidifier nearby.
While you’re waiting for your plant to recover, water sparingly, if at all, erring on the side of underwatering. The roots will be vulnerable as they grow back. Keeping the central tank filled (if it has one) should be safe and effective and may provide all the water your Bromeliad needs. Once new leaves begin growing again, it’s fairly safe to assume that the plant has recovered.
What If Your Bromeliad Isn’t Overwatered?
There’s a chance that when you take your Bromeliad out of its container, you’ll find no signs of rot at the base or crown, and the soil won’t feel overly damp. Misdiagnosis is always possible when dealing with houseplant problems. Here are a few other issues that can mimic some of the symptoms of root rot:
- Cold shock. If you’ve accidentally exposed your plant to extreme cold — for example, by placing it near a drafty window in the wintertime — some of its tissues may have died off. This can still cause rotting leaves with mushy, wet, or brown spots. But the roots and the base of the crown will often be unaffected. Move your Bromeliad to a comfortable temperature (but don’t overheat it) and snip off any dying leaves with disinfected pruners.
- Sunburn. Overexposure to direct light might cause brown spotting on the leaves. You can often distinguish this from root rot because the dead areas will feel papery and dry. They’ll also probably all be on the side of the plant facing the sun. The only cure is to move your Bromeliad somewhere with a bit more shade.
- Nutrition problems. Shortages of certain nutrients could cause yellowing leaves and withered growth, which you might mistake for root rot. You can usually solve this by applying a small dose of liquid houseplant fertilizer. Be careful, though — too much fertilizer can also cause yellowing and browning of the leaves, usually concentrated at the tips. If that happens, flush the soil out with an extra-long drink of water.
Final Thoughts
It’s not easy to save an overwatered Bromeliad once rot gets a toehold on the plant. These plants have a hard time resisting the disease due to the quirks of their structure that we described above. Don’t feel too bad if you wind up having to toss out a dead and mushy specimen. The same thing has happened to many Bromeliad owners before you.
If you do manage to rescue your plant, congratulations! You’ve pulled off a tricky houseplant care maneuver and earned some bragging rights. Just keep our advice about prevention in mind for the future.