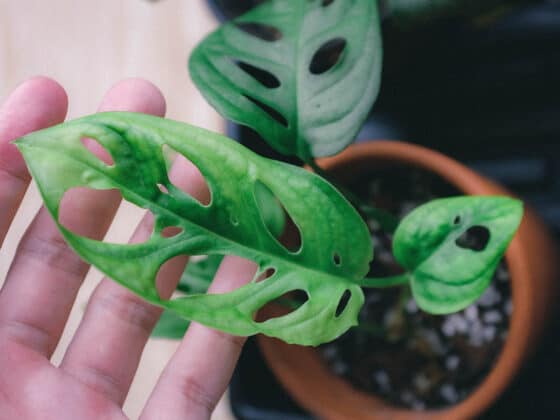
I purchased my first Monstera Adansonii in early 2020 and could not believe how quickly the plant grew! I knew that eventually I’d want to stake the plant up, but I had no idea that I would be faced with the responsibility so early. If you’re in the same boat as I was, don’t worry. Supporting Monsteras and training them to climb is a really simple task.
Hoping to encourage your Monstera adansonii to reach new heights? Supporting a Monstera adansonii is a great way to encourage your plant to grow. Moss poles, trellises, and stakes are all great solutions. These structures can be purchased or made at home, helping your plant grow upright and stay hydrated.
If you are curious about how to make moss poles work for you and your Monstera adansonii, it’s actually quite simple. Keep reading for advice, tips, and tricks to grow a tall, vibrant, Monstera adansonii, all without breaking the stems or the bank!
Monsteras in the Wild
With busy lives and hectic schedules, most plant lovers dream of finding fast-growing and hardy plants that take little maintenance on their part – enter Monstera adansonii. A tropical plant originally found in the forests in Mexico and Panama, Monstera adansonii has unique and attention-grabbing leaves and grows quickly with basic care.
One of the distinctive traits of Monstera adansonii is its ability to grow as both a climbing and trailing plant. This means that you can grow Monstera adansonii like a vine, using a hanging basket or train it as a climbing plant, which can navigate up a wall, trellis, or pole. This adaptability provides Monstera adansonii owners with some fun options to fill their home or office and traces back to the plant’s origins in the wild.
Monstera adansonii plants are known as “epiphytes,” which is a category of plants that grow on the surface of other plants. Epiphytes form a kind of partnership with other plants, using them for support and gathering water and air from the plant’s surface.
But this isn’t a selfish relationship. Epiphytes don’t harm their hosts and help clean up the area around the host plant, gathering nutrients from debris or organisms that might otherwise harm the host plant.
While some of these plants are funguses and other organisms, many of them are vines that can be found climbing trees in jungle habitats. These vining plants, such as Monstera adansonii, can climb using aerial roots.
As the name suggests, aerial roots grow in the open air, above the soil, and while they help absorb nutrients and water, like typical roots, they also help the plant attach to surfaces. These roots extend from the plant’s stems and can develop along the length of the plant, not just the bottom.
Since growing this way is natural for a Monstera adansonii, many plant lovers enjoy experimenting with ways to encourage their Swiss Cheese plant to grow up surfaces in their home or office, overtaking bookshelves, staircases, and even walls.
Does Monstera Adansonii Need to Climb?
What if you don’t want your plant climbing the walls or taking over your office breakroom? Although in nature they prefer to climb, Monstera adansonii are versatile plants. If provided with the light, water, and nutrients they need, Swiss Cheese plants can live long, happy lives as vines. And you may find that they grow every bit as quickly.
As a trailing vine, Swiss Cheese plants can develop trails of 13 feet and may need to be pruned regularly to keep them from getting unruly. When allowed to climb, these plants can easily reach heights of 10 feet indoors, allowing for quite an impressive display.
However, one challenge of growing your Monstera as a climbing plant is that it needs appropriate structure. Although it can grow as tall as a small tree, Monstera adansonii does not have the thick trunk and deep root system required to stand independently. And if it doesn’t have adequate support, the plant can tip over, possibly breaking stems in the process.
For this reason, Monstera owners look to structures like moss poles and trellises to help provide reliable support that won’t damage the plant or your furniture.
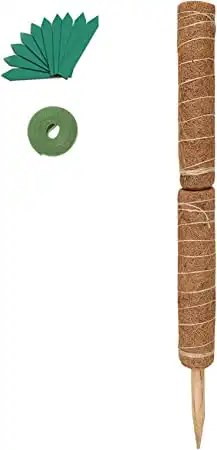
What Are Moss Poles?
A moss pole is a plant structure created from a pole, stick, or sometimes a PVC pipe that has been covered in moss or coco coir. They can also be made easily by converting stakes or broomsticks into poles and wrapping them tightly in a pliable form of moss.
Many plant enthusiasts like the appearance of moss poles since their greenery blends nicely into the habitat of the Monstera adansonii, and they don’t take up much space in homes or offices. However, these are not the only options for supporting your Swiss Cheese Plant successfully.
Moss Poles, Trellises or Stakes: Which Is Best?
As we previously mentioned, a Monstera adansonii can climb almost any kind of support, including the railing of your stairs or a bookcase. With this in mind, it’s not uncommon to see a Monstera climbing a trellis, stake, or another type of support that you can purchase from a garden center. And there are advantages and disadvantages to all of them. Let’s look at the most common options:
Trellis
A trellis is a structure that may resemble a ladder or lattice and is usually made of wood, bamboo, or metal. It can be relatively easy to encourage your Monstera adansonii to grow on a trellis since there are so many different sections of the structure on which the plant can take hold.
If you are accommodating a large Monstera, consider adding a trellis in the form of a tomato cage. This can be inserted around the edges of your planter and won’t harm the established root system. And while you may feel that the trellis overpowers your plant at first, your fast-growing Monstera will quickly fill the space, obscuring the structure below.
However, as beneficial as a trellis can be, it can be a cumbersome addition to many indoor spaces and may not be practical for most homes, apartments, or businesses.
Stakes
Plant stakes can take various forms and may include metal rods with supporting loops designed to hold stems straight, simple bamboo rods, or wooden sticks, branches, or rods, varying in height and texture. These are the most straightforward to make or purchase and are extremely easy to install, only requiring to be inserted directly into the soil by the plant.
That said, these structures do not always have the best texture to encourage the plant to establish a strong grip on its own. Since Monstera plants can become quite heavy, a weak grip from the aerial roots can result in a plant that falls over, tipping its pot or breaking stems.
Additionally, while you can use ties to help support the plant as it begins to connect to the structure, these can harm the plant if it does not form a strong attachment on its own.
Moss Poles
Moss poles build off the idea of a garden stake but wrap the surface in soft, moist, richly textured vegetation. The moss provides an easy to grip surface similar to that of the natural habitat of the Monstera adansonii, which allows the plant to form a sturdy attachment for climbing and holding its weight. This reduces the likelihood that the plant will tip over.
Additionally, the moss holds moisture, introducing humidity into the Monstera’s environment while providing a soft cushion for its aerial roots. These natural-looking and affordable structures are the most popular means to support your Monstera and will definitely provide your plant with a great start to achieving its growth potential.
Some moss poles are covered in moss (duh!), but a large majority of the totems available for purchase are actually wrapped in coco coir. Coco coir functions exactly like moss for these structures and is just as effective at supporting Monsteras.
DIY Moss Poles
While you can purchase moss poles from Amazon or a local garden center, you can make them, as well. And while the pole is probably pretty easy to manage, the moss aspect might be worrying you a bit.
Sphagnum moss is often recommended for moss poles and can be purchased in garden centers or online. Once you’ve bought your moss, the first step is to soak it in a tray for roughly 20 minutes. Once it is softened, you will need to tie the moss to the pole or stake you’ve chosen.
Now, this can be the tricky part. Sphagnum moss can have a chunky texture and can be challenging to attach to a pole. Since you will have to tie the moss to the pole with fishing line, twine, or yarn, you will have to stretch and work the moss around the pole, tying it as you go.
You may need to repeat this step a couple of times until the pole is covered with a half inch to one inch of moss. Do not cover the bottom several inches of the pole since this portion will be placed in the pot.
If this sounds intimidating to you, consider preserved sheet moss instead. This option is a little more expensive but comes in larger pieces of moss, so it is easier to wind around the pole. When using sheet moss, make sure to keep this moss moist as you wrap it around the pole – allowing it to dry out can make it brittle.
Once you have the pole covered in moss, you are ready to insert it into the planter. Gently dig a hole just wide enough for the pole in the Monstera’s pot. If you encounter resistance from the plant’s roots, consider placing your pole closer to the edge of the pot to not damage your Swiss Cheese plant’s roots.
Gently insert the unwrapped section of the pole into the hole until it is deep enough to stand upright, and carefully pack down the potting mix to secure the structure in place. Test the pole to make sure it is planted deep enough to provide a secure structure. If the pole is too loose, plant it just a bit deeper until you feel confident that it can hold the weight of your plant.
When Is It Time to Add a Moss Pole?
You can introduce a moss pole at any time in the life of your plant. However, if your goal is to train your plant to thrive as a climbing plant, it may be wise to introduce your plant to the moss pole while it is still relatively young. Doing so will allow you to encourage your plant to grow up the structure while the aerial roots are immature enough to tightly affix and wind their way into the mossy structure.
This is not to say that you cannot introduce a moss pole once your plant’s growth has naturally slowed, but you will likely not see the same rapid results, and your plant may have already grown unwieldy.
Another reason to consider introducing a moss pole early in your plant’s growth is that placing a stake or pole in the pot’s center can disrupt the roots. The likelihood of damaging the roots during insertion is more significant if the roots are densely packed and fully grown. This may force you to place the pole at the side of the pot or risk causing harm.
You are less likely to encounter densely packed roots with an immature plant, allowing you a bit more room to safely insert the structure in the center of the pot.
A great time to introduce a moss pole is during the first repotting of your plant, which will likely occur after roughly a year of growth. However, if you notice that your plant is becoming top-heavy and beginning to grow outward, as opposed to up, feel free to introduce the moss pole at that time.
Since you can repot a Monstera adansonii along with its moss pole, there is no danger in training your plant on this structure sooner rather than later.
Training a Monstera Adansonii to Climb
So, once you have inserted a moss pole into your Swiss Cheese plant’s pot, how do you make it grow up the structure? Even though plants can’t think they can learn. But the process requires a bit of attention, patience, and a quick trip to the store for some garden ties.
Can you use string or yarn to tie your plant to its new support? While you can use these options, be mindful that the moisture in your plant’s environment could start to rot the thread. This could result in your plant falling free from its ties and damaging its stems. Another potential issue with string or yarn is that it may hold water and bacteria, trapping moldy thread against your plant.
Ties and tape made specifically for gardening are less likely to break, rot, or grow bacteria. For this reason, you’ll want to use garden wire, garden ties, or fishing wire to help you secure your plant to the moss pole.
When you’re ready to begin, start by wrapping your Monstera adansonii vines around the pole, securing the plant to the structure as you go. You will want to make a point of attaching the nodes (the little knots where the leaves meet the stem) to the moss pole. These nodes are where the aerial roots develop, and placing them close to the moss pole will signal to your plant that it has a surface to climb.
Be careful, though. While you want your plant to be held securely against the moss pole, do not tie your plant too tight. You don’t want to accidentally cut the stem. Doing so can introduce bacteria into your plant and harm its health and growth. Continue securing your plant around the pole until you have reached the top.
As you water and prune your plant, keep checking for new growth. Any new vine sections that are not growing tightly to the pole will need to be pruned or affixed using gardening ties. This will keep your plant growing upward with the support of its mossy structure.
In time you will notice that the lower sections of your plant are tightly intertwined with the moss. Once the aerial roots have grown deeply into the moss, you can remove the lower ties, allowing the plant to lean entirely on the pole for support.
How to Repot with a Moss Pole
Since your plant is now intertwined with its moss pole, and the moss pole is stuck firmly in a pot, how are you supposed to repot the plant? Monstera adansonii is a notoriously fast-growing plant, so you will face the need to repot your plant within the first year or two.
Repotting your plant every 1-2 years provides your plant with room for its roots to grow, encouraging further growth. Furthermore, repotting introduces new, nutrient-rich soil, which can improve oxygen and water intake and the availability of vitamins and minerals.
You’ll be glad to hear that repotting with a moss pole can be done quickly and safely. And by following a few steps, you can transfer your Swiss Cheese plant to a bigger pot with its original pole still intact.
Spring is the best time to repot Monstera adansonii, as this is during the start of the growing season. This is important since repotting always causes a bit of “shock” to a plant. By repotting at the start of the growing season, you give your plant a chance to recover while it is at its peak, instead of repotting while the plant is dormant.
Make sure to water the plant 1-2 days before you repot. This will make it easier to remove the plant and help protect the roots, minimizing some of the transplant shock.
When you are ready to repot, gently remove your Monstera adansonii from the pot, carefully placing the planter on its side, if needed. You can use your Monstera’s moss pole to assist with this process, but don’t yank on the pole since that can damage the plant and its roots.
Once the plant is removed from the pot, carefully examine its roots. Your Monstera adansonii should have firm, light-colored roots. Slimy or blackened roots are a sign of root rot, which can kill your plant, so trim away any mushy or rotten roots with sanitized pruning shears, as needed.
Choose a pot that is roughly two inches larger than the pot from which you removed your plant – for example, an 8″ pot, instead of a 6″ pot. Fill the new, larger pot with enough potting mix that the plant roots will be roughly half an inch below the top of the planter.
Be careful to support the plant and the pole as you make the transition. Do not carry the plant by the pole alone since that may damage the aerial roots. As you introduce the plant to the new container, don’t bury too much of the stem by allowing dirt to mound around the base of the plant – this can lead to rot.
Since repotting can cause some trauma to the plant, your Monstera adansonii may need a few weeks to recover. During this time, your plant may appear a little limp, and some leaves may yellow. But in a few weeks, your Monstera should be on the mend and will have plenty of room to continue its upward climb!
How to Change Out a Moss Pole
Monstera adansonii plants are famous for their growing ability, reaching heights of ten feet when grown inside. Since it’s unlikely that you provided your plant with a ten-foot moss pole, you might be wondering how to provide a taller frame for continued growth.
But that is not the only reason you may want to change out your plant’s moss pole. In time, you may notice signs of age or decay and wish to change the moss pole for appearance or for the safety of your plant.
There are a couple strategies that you can consider to introduce a new moss pole for your Swiss Cheese plant. First, look closely at the connection between your plant’s aerial roots and the moss pole. If your Swiss Cheese plant’s roots appear to be embedded in the moss but not affixed to the pole underneath, you may be able to very carefully strip the moss from the old stake with only minimal damage to the roots.
This may be a time-consuming process, and you will not be able to re-use the detached moss, but trimming away bits of old moss, and allowing the remanent to dry, should help you free your plant safely. This would allow you to insert a new, fresher, taller pole into the center of the planter and start the affixing process all over again.
But what if your plant seems to be firmly attached to the pole and cannot be freed so easily? The most time-consuming strategy, though possibly the safest for your plant, is to simply introduce a new pole into the same pot, next to the one to be replaced.
With a little time and coaxing, new aerial roots from your Monstera will gravitate to the newly introduced structure, climbing the new moss pole. This can provide you with an opportunity to begin gently removing the old pole or deconstructing it, if necessary.
Stackable Moss Poles
Because of how difficult it can be to change out a moss pole, I am a big fan of stackable, extendable moss poles. Several companies create these poles in one-foot sections that can be inserted into the top of your pole to extend the growth. Stackable moss poles can be found online (like this one on Amazon) and can save you a lot of hassle if you use them from the start.
Putting it All Together
While a moss pole can provide a great head start for your plant to grow and thrive, it is not a substitute for a good care routine. Your plant will benefit most from the moss pole if the vegetation on the pole is kept moist through regular misting. However, be careful that this does not lead to overwatering.
If your intention is to moisten the moss, do not pour excessive water over the stick – this can lead to water running down the pole and saturating the soil. Start with a gentle, weekly misting, just to keep the moss soft.
Don’t forget to prune away any yellowing or browning leaves. While seeing too many discolored leaves is a warning sign of a larger health issue, even a healthy plant will show an occasional yellow leaf. Once a leaf turns yellow, it will not turn green again. But don’t be sad – just like humans and pets lose hair, plants shed leaves.
Removing this dying foliage will help keep your plant healthy and will allow it to focus energy on new growth. And by following these tips and tricks, you will soon have a thriving, healthy, and sky-high Monstera adansonii!