My Monstera adansonii grows like wildfire. It puts out tons of new leaves and stems during the spring and summer, which allows me to take some clippings to share with my fellow plant-loving friends. Thankfully, taking cuttings from this plant is so simple and straightforward that even the newest houseplant owner can succeed.
Lovers of Monstera adansonii will be happy to know that propagating a Swiss Cheese plant from a stem is easy. Simply find a healthy portion of the stem, including at least one leaf and node, and clip with sterilized scissors. After rooting your cutting, it will be ready to transplant into soil.
Propagating your Swiss Cheese plant from a cutting is fun and easy! With the right conditions and some patience, a Monstera adansonii can be propagated in just a few months and will grow quickly in your home or office. Below is a how-to guide to help you grow your new Monstera adansonii, just like a pro!
Growing Monstera Adansonii From Cuttings
Monstera adansonii is one of the simplest plants to propagate. A cutting from a healthy stem is all that is needed to turn your one plant into two, three, or more. Unlike some more demanding plants, you won’t need rooting hormones or unique lights. All you need is sharp, sanitized scissors, clean water in a glass, and a brightly lit room. Now let’s get started!
How to Take the Best Monstera Adansonii Cutting
If you were growing a plant from a seed, you wouldn’t use damaged or mushy seeds, would you? Probably not, since they wouldn’t look healthy. The same concept applies to propagation via cuttings.
Before you start snipping, take a minute to look at your Monstera plant. Your goal is to identify healthy stems. Stems should be firm to the touch, with a nice, uniform green color and no sign of yellowing, browning, or mushiness.
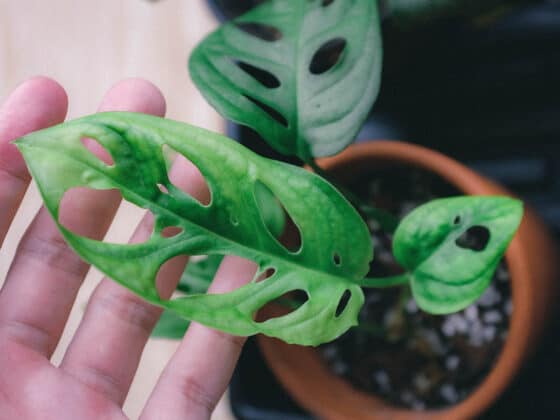
Look for mature stems. This will be obvious because Monstera leaves are tightly rolled in the beginning. As they, and the stem, mature, they will unfurl, and the leaves will eventually develop lacy holes. Look for stems with flatter, larger, healthy-looking leaves.
Ideally, the stems you pick will have at least one healthy leaf on them since stems with leaves tend to propagate more quickly. You should pick more than one stem, if possible. This will allow you to have a better chance of successful propagation. Once you have selected some firm, healthy stems with mature leaves, you’re ready to start cutting.
Cutting Monstera Adansonii Stems
A clean, disinfected pair of scissors will reduce the chances of bacteria harming your plant. And while there are special disinfectants on the market, I prefer to make my own diluted bleach mixture (one part bleach to nine parts water). You can also use 70% to 100% rubbing alcohol to clean the blades.
You want to use sharp scissors, so pass on the pair you use for scrapbooking and invest in sharp pruning scissors. Dull scissors may crush your plant’s stem, harming the growth. Carefully clean and dry your sharp scissors, being careful not to cut yourself.

Wearing garden gloves, gently hold your Monstera stem in one hand. Choose a place on the stem with at least one node and using clean, sanitized scissors cut slightly below the node, and set the cutting aside. Continue taking cuttings until you have a few healthy stems to propagate.
Identifying Nodes on a Monstera Adansonii
If the idea of nodes is a new one to you, you may be wondering how to identify this part of the plant to include in your cutting. Thankfully, this is super easy with a Monstera adansonii.
The stem of any plant is made up of nodes and internodes. The nodes are the parts where new growth can emerge from the stem (including leaves, buds, branches, and roots). The internodes are simply the areas between the nodes. Monsteras tend to have a lot of nodes because they are vining plants.
On a Swiss Cheese Plant, the nodes are extremely obvious. Examine the longer stems of your plant, and you will see small white or brown knobby growth coming from near where each leaf is connected to the stem. These are nodes.
When taking a cutting for propagation, nodes are crucial because they contain the cluster of cells needed to produce new growth. Once you’re ready to root your cuttings, new roots will emerge from these nodes.
Without a node on a cutting, your plant will not develop the roots they need to create a new plant. A single leaf (without a node) can often grow small roots, but while the roots may support the leaf for a little while, no new stems or leaves will emerge from the cutting.
Rooting Cuttings in Water
Monstera adansonii cuttings can be rooted in water or in soil. There are advantages to both options, but I prefer water rooting, so let’s talk about that first.
To root your plant cuttings in water, simply place the cuttings you took into individual glasses or vases filled with clean water. Standard tap water is fine for rooting unless you think your water may be of low quality. If you don’t feel comfortable drinking your tap water, use filtered water for the rooting.
If your stem cutting has multiple leaves, you remove the ones from the bottom before submerging it in water. As long as you leave one to two leaves on the cutting, your plant-start will be able to photosynthesize and create the energy it needs to grow.
Be careful not to let your cutting slip to the bottom of the glass or vase. Position the cuttings so that the rim is beneath the healthy leaf to keep the nodes submerged, but most of the cutting and all of the leaves dry. Then, place your cuttings in a location with bright but indirect light, such as a curtained window. Within a few weeks, you should see new roots beginning to develop, though they may be small at first.
Rooting Cuttings Directly in Soil
The other option for rooting your cuttings is by placing them directly in well-draining soil. (The well-draining part is essential to emphasize because soggy soil will kill a cutting, as well as a full-grown plant.) Look for soils that contain ingredients like peat, orchid bark, and perlite. These will help retain the right amount of moisture and nutrients to help your plant thrive.
Once you have taken your cuttings and filled a pot for each cutting with the appropriate soil, you will want to carefully make a hole in the center for your cutting. Bury the base of your cutting until the node is covered and then gently press down to hold your plant firmly in place.
Do not plant your cutting too deep as this can lead to stem rot. Give your cutting a small amount of water, and place it in a sunny location, avoiding direct sunlight.
Transplantation to soil can cause shock for your plant, so you may see a bit of limpness or yellowing at first. Be patient and avoid overwatering or fertilization. In a few weeks, your plant should begin to look healthy, and new roots will start to grow beneath the soil.
Planting Monstera Adansonii Cuttings
Should you choose to propagate your Monstera adansonii in soil, you will be welcome to leave your plant in its new home until it begins to outgrow the pot. While a Monstera adansonii can grow over two feet in a growing season, your plant may need a little time to adjust to its soil. With that in mind, you will likely be able to go a year before your soil propagated Monstera needs to be repotted.
If you root your plant in water, you should transfer the plant into soil when it is strong enough. It is possible to keep your plant in water permanently, but it will not thrive to the same extent that it would if replanted into soil. This is because soil is rich in nutrients that plants need and provides a nice balance of oxygen and structure to achieve a Monstera’s ideal length or height. (For more information on that, click here.)
For a plant that has been rooted in water, wait for your plant to have roughly one to two inches of healthy root before planting into soil. Use well-draining soil and a pot with a drainage hole, and be very gentle with the newly formed roots as you insert them into the dirt. Roots propagated in water can be fragile and easily torn if they are forced into the dirt.
Instead, dig a hole big enough to accommodate the roots and carefully cover them over, then pat down the dirt until the plant is stable. Now that your cutting is growing roots and is potted in a nutrient-rich home, your work is just beginning!
Caring for Your New Propagation
Monstera adansonii are easy to grow plants that will flourish quickly in the right conditions. However, they still need a bit of TLC to keep looking and feeling their best. Young Monsteras are a bit needier than their mature counterparts, so keep a close watch on your new plant for the first few months.
Watering and Humidity
Do not make the mistake of assuming that you should water your Swiss Cheese plant on a set schedule. Changes in temperature, lighting, and time of year impact how much water your plant needs, and watering at the same time every week can lead to overwatering.
Instead, focus on checking your plant’s moisture level regularly by inserting a finger into the soil. If the soil is dry 1-2″ down, water your plant thoroughly, and don’t water again until the soil feels dry. If you’d like a more exact method, a moisture meter can give you an accurate measurement of the moisture level in your plant’s soil.
Also, consider adding a humidifier to the room in which you have your plant and misting the leaves with clean water. This will help promote healthy foliage and keep your plant in a moist environment without overwatering. In nature, Monsteras are tropical plants. Humidity goes a long way in recreating their natural environment.
Light and Temperature
It is common for plant owners to think that more light is better. But many plants, including Monstera adansonii, do not grow well in direct sunlight, which can burn their leaves. Once your plant’s leaves become damaged by the sun, discoloration occurs, growth will slow, and the plant can even die. Instead, place your Swiss Cheese plant in a space with bright but diffused light, like a well-lit office or room with a curtained window.
Thankfully, Monstera adansonii thrives in most indoor temperature conditions, but 65 – 75 degrees Fahrenheit is the plant’s preferred range. Avoid placing your plant in cold, drafty spaces or in hot sunrooms. Both temperature extremes can make your plant sick and can slow its growth.
Fertilizer
The concept of fertilizing can seem complicated but just think of fertilizer as a boost of nutrients for your houseplants. Since your plant will live in its container for a long time, it is common for soil to become stale and lack nutrients. Fertilizer can help restore the nutrients to your plant’s container, keeping your plant healthy and strong.
How much fertilizer your plant needs will depend on its size, so it’s best to start with only a small amount and see how your plant responds. Generally, your Monstera will only need to be fertilized about 3-4 times a year and should not be fertilized in the winter.

While some confident plant owners may create their own fertilizer blends, preblended plant food like Jack’s 20-20-20 Houseplant Fertilizer works well and is what I use. Just avoid getting any fertilizer directly on the stem or roots of your plant, and do not over-fertilize – there can definitely be too much of a good thing!
Pruning
As your plant grows, you may find yourself needing to do a bit of pruning. You will want to prune away any dead or dying leaves to help your plant conserve its energy and encourage healthy growth.
It is a good idea to prune your Monstera adansonii in the spring, which allows your plant to recover over the course of its growing period. For more tips about pruning, check out our article here.
Repotting
Once your plant begins to grow and thrive, you will eventually need to repot it to encourage growth. Transferring your Swiss Cheese plant into a slightly larger pot every year will allow the roots to expand and help the plant grow overall.
Spring is the best time to repot Monstera adansonii, as this is during the start of the growing season. When you plan to repot your Monstera, make sure to water the plant 1-2 days before you begin. This will make it easier to remove the plant and will help protect the roots.
When you’re ready, gently remove your Monstera adansonii from the pot and brush away dirt from the roots to examine them. Slimy roots are a sign of root rot – a condition that will spread throughout the root system of your plant. Cutting away rotting roots now may save your plant’s life, so trim away any mushy or rotten roots with sanitized pruning shears, as needed.
Fill the new pot with enough potting mix that the roots of the plant are roughly half an inch below the top of the planter, and be careful not to bury too much of the stem by allowing dirt to mound around the base of the plant.
Since repotting can cause some trauma to the plant, your Monstera adansonii may need a few weeks to recover. But once it becomes used to its new planter, it should have plenty of room to expand and grow.
Putting it All Together
Monstera adansonii is a popular plant for a reason. It is easy to care for, quick to grow and can be successfully propagated by novice plant enthusiasts. However, each plant species is a little different and has unique needs to grow and thrive.
For more tips and tricks for getting your Swiss Cheese plant to grow, read our article here. By following some simple advice and paying close attention to any signs of sickness, such as yellowing or browning leaves, you can start a thriving collection of Swiss Cheese plants for your home or office. Now, what are you waiting for – get growing!