Overwatering is one of the most common care issues that people come across with Fiddle Leaf Figs (Ficus lyrata). Knowing that these houseplants need some extra attention, we can easily become a little overzealous in caring for our Figs, often overcompensating with too much water. Unfortunately, overwatering can lead to a myriad of health issues, including root rot. If you find your Fiddle Leaf Fig is overwatered or suffering from rot, what exactly can you do to save it?
Overwatered Figs should be removed from their pot, inspected for root rot, and any dead or discolored roots should be removed. Then these plants should be repotted with fresh soil in a sterilized container. If you do find rot, treat the roots with a fungicide rinse to aid in a healthy recovery.
Root rot can creep up on an otherwise healthy-looking plant, especially if the plant is getting watered too frequently or has poor drainage. Once you start seeing signs of rot, you’ll need to act quickly because a Fig can and will decline fast, making it difficult for your plant to recover.
This article will cover what root rot is, what causes it, and some common signs to look for if you suspect your Fiddle Leaf has it. I’ll also dive into steps you can take to rescue your plant from overwatering and root rot so that your Fig has the best chance at a full recovery.
What is Root Rot?
Root rot is exactly what it sounds like: rotting roots This can cause irreparable damage to individual roots and lower the plant’s ability to absorb both water and nutrients thus hindering the execution of vital processes like gas exchange.
Root rot is often caused by overwatering. In situations where a Fig’s soil has been waterlogged by too frequent watering or poor drainage, the roots can no longer absorb oxygen and begin to decay, leading to rotten tissue, which can spread to other areas of the plant.
Another cause of root rot is an infection from bacteria, fungus, and fungus-like microorganisms already present in the soil. These microorganisms can lie dormant in the soil for long periods of time and activate when it becomes saturated with moisture. This overly wet environment causes fungus spores to multiply and attack the healthy roots of the plant, causing them to rot.
Rot severely hinders the plant’s ability to perform basic functions that keep it alive, and as its health declines, you may start seeing signs that the plant is in distress.
Above Ground Signs of Root Rot
Root rot can kill even the most mature and established Fiddle Leaf Figs in a short time period. To give your Fig the best chance at survival, it is absolutely imperative that you quickly notice the signals your plant is sending you and act to reverse the effects of root rot. Lucky for us, Fiddle Leaf Figs are excellent communicators.
These high-maintenance beauties will display any discomfort or distress through physical signs as a warning signal to their caretakers. We often label them as “dramatic” but the truth of the matter is that they are just quick to react to environments that aren’t meeting their needs. So, if yours is suffering from root rot, there’s a good chance you’ll see signs of it somewhere on the plant.
Many of the above-ground signs of root rot are the same as those that signal overwatering. This is simply because in almost every situation, overwatering will be the underlying cause of rot appearing somewhere on your Fig. The good news is that if you can identify these signs in your plant early enough, you might have time to correct your watering issues before root rot actually has a chance to set in. So what should you be on the lookout for?
Often the first sign of distress appears as discoloration in the foliage. Yellowing leaves are a classic sign of overwatering, especially if they start on the lowest levels and work their way up the plant. This indicates that your Fig is having trouble absorbing the needed nutrients to create and maintain chlorophyll in the leaf tissue, which means the roots are struggling, likely because they are waterlogged by too much moisture.
Another symptom of overwatering is brown spots or splotches on the leaves (or entire leaf edges turning brown.) This is a more severe sign that the plant is suffering from excess water and tissue is starting to rot.
Both yellow or brown appearing on the leaves can also be accompanied by drooping. In chronic cases of overwatering, and especially if the root system is being attacked by rot, you might see the entire plant begin to droop.
This is different from wilting caused by underwatering, where the plant appears to become more brittle and desiccated. Droop often looks like the leaves (and sometimes entire stems) are actually softening and drooping or caving under their own weight.
Often, in cases of overwatering and rot, you’ll also witness your Fig dropping its leaves. This usually starts at the bottom of the plant and works upward. It is normal for a plant to drop a leaf from time to time due to old age, but if you see this rate accelerate over the course of a few weeks, you’ve likely got a more serious situation going on underneath the soil.
Below Ground Signs of Root Rot
Although the first noticeable indications that your Fiddle Leaf Fig is experiencing issues with rot will likely show above ground, you can confirm there is an issue if you remove your plant from its container and check things below the soil line.
First, if you remove the plant’s root ball from the container and notice it is dripping wet, you’ve got a problem. Aside from the times when you’ve just watered your plant, the soil should never be waterlogged or completely saturated to the point that water is dripping. If your soil is in this state, you either water too frequently or your container and soil have very poor drainage, both of which lead to rot issues.
You may also notice that the soil smells musty or dank. Healthy soil should smell earthy and rich, even when it’s wet. So if any bad smells are coming from your container, it’s an indication of poor soil conditions due to oversaturation and possibly fungal or bacterial infection.
The most telling below-ground sign of rot has to do with the roots themselves, and luckily, rotten roots are pretty easy to identify. Brush away the soil from the root ball and get a good look at the roots themselves. Now it’s time to determine whether or not the roots are healthy or rotten.
Healthy vs. Rotten Roots
How can you tell the difference between healthy roots and rotten roots in your Fiddle Leaf Fig? It comes down to color and texture.
Healthy roots in Figs are typically white or cream, although larger ones with thicker sheaths can look pale brown. When touched, they feel firm but are still pliable and can easily bend without breaking or tearing.
Rotten roots, on the other hand, are usually dark brown or black. They are mushy to the touch, and when gently pulled, their sheaths are sloughed off easily, or they break away from the root structure entirely.
It is pretty apparent once you start digging around in the root ball which ones are healthy and which are suffering, and in a lot of cases, rotten roots will break away when you rub or wash the soil away from the root ball.
How to Save a Fiddle Leaf Fig from Root Rot
I’ve covered what root rot is and what some of the signs are when your Fiddle Leaf Fig might be suffering from it. So, what should you do if you suspect your Fig has root rot? You’ll want to act quickly, as rot can really do a number on a Fig tree in a matter of days or weeks. By following the steps I’ve outlined below, you’ll be giving your Fiddle Leaf its best chance at a full recovery.
Step #1 – Inspect the Roots
Once you confirm you are seeing any of the signs of overwatering or rot, it is best to confirm your suspicions by checking the root system and looking for any actual signs of rot.
To do this, gently remove your plant from the pot or container. If your plant is larger, you can tip the pot on its side and slide the entire soil ball from it. Use a spade or butter knife to loosen soil from the inside edge of the pot if you’re having difficulty removing the plant.
After you have your plant removed, brush or wash away as much soil as you can from the root ball. You want to get a really good look at the root system, so try to remove as much soil as you can.
Once you’ve got the soil cleared away, carefully inspect the entire root system for signs of rot. Remember, healthy roots will be white and firm, while unhealthy or rotten roots will be brown or black and mushy.
Step #2 – Cut Away ALL Rotten Roots
At this point, if you have identified any rotten root structures, you need to remove them from the plant. Rot can quickly spread, especially if it is caused by a fungal infection, so you’ll need to remove every infected root. This is no time to prune lightly. All rotten roots must go.
Use sterilized, sharp scissors or garden shears to clip away any damaged roots. Rotten roots won’t recover, so it is best to remove anything that looks damaged, even if that means a majority of the root system has to go.
Do wipe your shears down with hydrogen peroxide or a diluted bleach solution between every cut. While this step may seem unnecessary, trust me, it is not! This will keep you from potentially transferring bacteria or infection to healthy portions of the plant.
Step #3 – Repot Your Fig
Now that your plant is free of rotten roots, you will need to repot your Fig into new potting soil. There are a few things to remember that will help make this step as successful as possible. Your plant is missing part of its root system and has the added stress of being transplanted, so controlling as many variables as possible will make a big difference.
First, choose a potting soil that is light, airy, and well-aerated so that it drains well. You absolutely cannot have poor drainage at this point. If you don’t feel your regular potting mixture is porous enough, add some perlite or pumice to lighten it up. One part pumice to four parts soil should be sufficient.
Lighter soil will also help what remains of the plant’s root system to re-establish quicker. The faster the roots can acclimate and establish in the new soil, the faster your plant will recover. Light, porous soil contains more space and oxygen for the roots to utilize while still properly retaining moisture and providing stability for the plant.
You’ll also want to reconsider your pot. Did your Fig’sFig’s old pot have sufficient drainage? Did it have a drainage hole? If not, pick something that does. To keep your plant healthy, any excess water needs to be able to fully drain from the bottom of the pot.
If you plan on using the same pot, you MUST sterilize it. Remember that root rot is often caused by microorganisms, and if you just replant it in the same dirty planter, you might reinfect your plant after all this work.
Soak your container in a bleach-water mixture for at least 15 minutes and then thoroughly scrub the pot with soap and water to ensure a sterilized environment for your plant.
Replant your Fiddle Leaf so that the root ball is fully covered by the soil and the crown of the plant sits right about where the old soil line was. Gently pack the soil in so the plant is supported and upright. Water it in by gently soaking the soil thoroughly until the excess drains from the bottom of the pot.
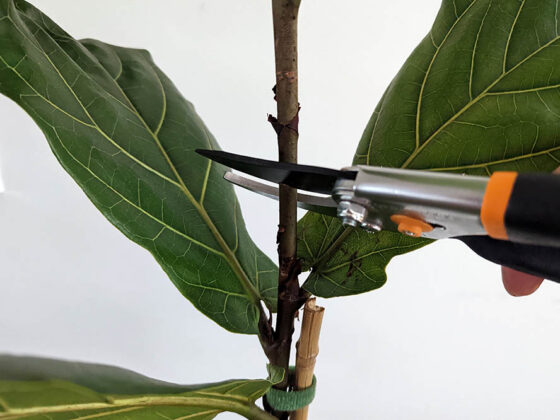
Step #3B – In Extreme Cases of Root Rot, Cut Back the Foliage
If you had to remove more than ⅓ of the root system due to rot, you may need to cut back a portion of the above-ground growth as well. Remember, root rot is a serious ailment that even a mature plant may suffer to recover from. To give your plant the best chance at survival, reduce the energy needed from the plant by removing the top third of the Fiddle Leaf Fig.
Use your sterilized shears (remember, you don’t want to transfer the infection to the healthy portion of the plant) and clip just above a node. If this top portion is healthy, you’ll be able to propagate it.
Step #4 – Monitor Your Fig for Improvement
At this point, you now have to play the waiting game. Your Fig just went through a high-stress situation, and it might take a few weeks for it to bounce back from the shock.
Your Fig probably won’t grow at all during this time. All of its energy will be focused on repairing its root structure, so don’t be alarmed if your plant isn’t producing any new leaves for a while.
Any leaves that were affected by rot should be carefully monitored. If they are severely yellowed or browned, it is probably best to just prune them off now so the plant can redirect its energy elsewhere. Leaves with small spots of brown may survive just fine, although the brown tissue will eventually disintegrate away, perhaps leaving a hole or tear.
Your Fig may still drop leaves, more due to shock than lingering rot problems, but as your plant recovers, this should eventually slow and stop, as well.
In several weeks to a few months, you can gently remove your plant from its container to check on the progress of the root system. With luck, you’ll see new roots circling the edges and bottom of the soil ball, indicating that new growth has occurred.
A Quick Note on Fungicide Treatments
I mentioned earlier that root rot can be caused by fungus in the soil, so it makes sense that many people want to treat their Fig with a fungicide rinse to further stave off root rot.
In many cases, applying a treatment of liquid fungicide does control the microorganisms causing the issue. However, be aware that root rot can be caused by things other than fungus, so applying any type of fungicide might not do anything at all, or in some cases, might have adverse effects on an already compromised plant.
If you want to take the extra precaution of using a fungicide to treat your Fig, make sure you apply it according to the instructions provided by whatever brand you are using, being careful not to overdose your plant.
Some people will dip the roots in a fungicide solution before repotting, while others prefer to wait until the plant has had some time to establish in their new soil before applying a fungicide rinse. Again, read the instructions for guidance on how to best use the product you’ve purchased.
In my experience, I have often saved plants from root rot by just following the instructions above. I only use a fungicide if I suspect the root rot is caused by a fungal infection like phytophthora or fusarium (common fungal infections in gardens and houseplants).
Caring for Your Fiddle Leaf Fig to Prevent Rot
Whether you have a healthy Fiddle Leaf or one that is recovering from root rot, it is important to review your plant care techniques to ensure you aren’t making your plant susceptible to root rot in the future. This means you need to evaluate your watering habits.
Root rot is almost always caused by inconsistent watering or overwatering, so making sure you understand when and how to water your Fiddle Leaf Fig will go a long way in protecting it from root rot.
To avoid underwatering our plants, lots of us like to implement a once-a-week watering schedule. Stop that! While it’s true that your plant might need to be watered once a week, I guarantee there are lots of times when that is too much water, and the result is soggy waterlogged soil.
A more accurate approach is to only water your Fig when the top two inches of topsoil have dried out. The soil still has moisture for the plant deeper in the pot, but by waiting for the top to dry out, you won’t ever water too frequently.
When you do water, do so thoroughly, fully saturating the soil and allowing the excess to drain from the bottom of the pot. Just make sure that extra water isn’t pooling in a saucer beneath your plant. Leaving your Fig in standing water is a quick way to find yourself with a root rot problem.
Final Thoughts
Root rot can be a serious health risk to your Fiddle Leaf Fig and a stressful thing to combat, so watching your Fig for signs of overwatering is your first line of defense. Proper watering goes a long way to ensure rot never gets a chance to take hold.
If you find your Fig has root rot, remember to act quickly and follow the steps to remove and repot it. By being decisive and thorough, you’ll contain the problem swiftly, allowing your Fig the best chance to bounce back and recover. Good luck!